Get our free set of "Dave Hill" Photoshop actions...


Last week we gave away our free tilt-shift action (it's still free, just follow that link), this week it's our free "Dave Hill" look action.

One of our long time readers actually created two "Dave Hill" Photoshop actions to share with everyone here on Weekly Photo Tips.

The first action is simply a "one click" and the action is applied, the second action stops at each stage of the effect allowing you to "tweak" it to your personal taste.

If you would like this set of actions along with the instructions on how to install them into Photoshop simply drop us an email and we'll get them out to you.

Click on the images to view larger.


Photography just for the fun of taking pictures...


Sometimes taking pictures is just about the fun of it, the joy of capturing the image.

This past weekend I had the pleasure of photographing a 5K color run, aka "the Happiest 5k on the planet", in South Portland (Maine).

We had outstanding weather, it was fun event and it was for great cause. If you are looking for a fun photography project check their website to find a color run near you.

My only suggestion would be to get some protection for your camera (like a rain sleeve for under $10 here or here) as the color is mixed in a fine cornstarch and the dust is EVERYWHERE (seriously, everywhere), so protect your gear.

Here are a few images from the day, click on any of them to view larger.


Welcome to week 3 of Flickr Friday...


Welcome to week three of Weekly Photo Tips Flickr Friday.

Today we are featuring the work of Jodi Renshaw.

Jodi has been one of our Flickr Group members for some time and I really enjoy her fun and whimsical images.

Check these out, and click on any image to view larger.


Jodi doesn't just do "fun and whimsical" here are a couple more of her images I really like.


You can check out Jodi's Flickr stream here, or her blog here.

If you'd like to join our Flickr Group (and we would love to have you and your images) you can find all the details right here.


Photography gear deals of the week...


Here are a few deals on some very good photo gear at great prices that may be of interest, AND they all come with free shipping.

RadioPopper JrX Studio Kit with Transmitter and Receiver - $199 


Giottos Vitruvian Aluminum Tripod & Monopod combo with QR Ballhead - $199


Glow HexaPop 20" for portable off camera flash - R Series - $99


Westcott Photo Basics 40" 5-in-1 Collapsible Reflector, 2 Pack - $49


Now this last item might not be photography related (though they could be used for monitoring sound for video), but I own these headphones and they are freaking amazing and so is the price! Seriously, I own Bose headphones as well and these are far better, hands down.

Able Planet Noise Canceling Over-The-Ear Headphones - $49.99 (originaly $149.00)


Free "tilt-shift look" resource #3, our step-by-step Photoshop tutorial!...


This is the last in our series of "Tilt-Shift Resources":

1. A DIY tilt-shift lens mount for Nikon cameras

2. Free tilt-shift lens look resource #1 - TiltShiftMaker.com
 
3. Free "tilt-shift look" resource #2, get our FREE Photoshop action!

And we are going to wrap up the series with a "faux" tilt shift lens tutorial, so here goes.

This is a quick and easy tutorial on creating the "tilt-shift look" in Photoshop.

Just one thing before we jump into the tutorial, the best shots for these are wide(r) angle shots from above.

And of course the image I am using for the tutorial is neither.

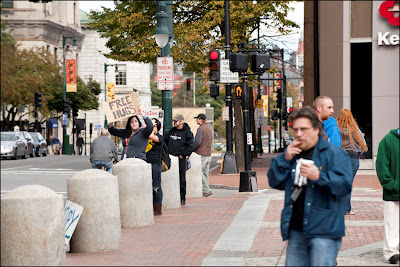
This was an image I took during the "Occupy" protests and I really wanted the focus to be on the young lady and her sign.


Here we go:

1. Open up your image in Photoshop

2. The first thing is to duplicate your image by either dragging it to the "create a new layer" icon, or keyboard command Ctrl + J on a PC or CMD + J on a MAC


3. Then go to "Filters", "Blur", "Gaussian Blur" and set the Radius to (roughly) 10


4. Add a mask to the layer that you created (and blurred)


5. Set you foreground color to white and background color to black


6. With the mask you just created in step 5 selected, use the Marquee tool to select the area that you will want to be in focus


7. Fill that selected area with black (PC - Ctrl + Back-Space, Mac - CMD + Delete)

8. Then deselect (PC - Ctrl + D, Mac - CMD + D)

9. Keeping the mask selected you will then go to the "Masks" tab and adjust the feathering to make it a bit smoother (around 70)


10. Select your curves layer to add contrast by creating an "S" curve


11. Then back to the adjustments tab and select "Vibrance" and adjust to taste


And the finished product.


Keep in mind the numbers I used are not necessarily the ones that will work for you, but they are a good starting point. I would love to see what you come up with.

Free "tilt-shift look" resource #2, get our FREE Photoshop action!...


Here is #2 in what will be a 3 part posting of free "tilt-shift look" resources.

Resource #2 is a free "Photoshop Tilt-Shift Action", yup, we said FREE and we are offering it to everyone of our readers

All you need to do to get your free Photoshop action is drop us an email and request the tilt shift action, and next week (after we have received all of your requests) we will be sending out the action (with instructions) to everyone who requested it.

Here are before and after images that demonstrate our tilt-shift action.


Click on any of these images to view them larger.


Pretty cool, huh?

So go ahead and drop us an email and we will be sure to add you to our tilt shift mailing group.

Free tilt-shift lens look resource #1...


As many of you know, we are BIG fans of the look that comes from using a tilt-shift lens, but alas most of us cannot afford one of those bad boys so we are always on the lookout for an alternative way of achieving "the look".

Well TiltShiftMaker.com has made achieving that look even easier.

You upload your photo, you select the area you want in focus, and you are done!

Another option available at TiltShiftMaker.com is to simply point to an image already on the web and create your tilt-shift image from there.

Below are a few samples from their gallery, and if you follow this link it will take you to 50 beautiful examples of tilt-shift photography.

Click on any of these images to view them larger.


A DIY tilt-shift lens mount for Nikon cameras...


I love DIY projects, whether its photography, home, or anything else. You get the satisfaction of doing it with your own two hands AND the finished project usually is at a significant savings.

I also love the images produced by a tilt-shift lenses, so this post is a perfect combination of the two.


Today we have a DIY tilt-shift lens mount for Nikon cameras, you will need a 3D printer but not to fret, if you don't have access to one locally (heck, even little old Biddeford Maine has local 3D printing resources), there are plenty of online resources that are both inexpensive AND fast (check out 3D rapid Print, Print to 3D, Ponoko, or Sculpteo).


There are just 6 (small) parts that need to be printed and assembled, Instructable user Cpt. Insano has been kind enough to not only lay out the entire project step by step, you can even download the files needed to be used with the 3D printer to produce the parts!

So follow this link over to Instructable and start on your DIY tilt-shift mount today.


If you have (or know of) a cool DIY photography project please email us and let us know so we can share it with the group.


Call for contributors to Weekly Photo Tips!...


Would you like to write a guest blog post for Weekly Photo Tips?

Well, it just so happens we are currently looking for contributors, so if you have a tip, a trick, a technique, a tutorial, or (almost) any photography related idea you would like to share with our readers we would love to know about it.

Any post that is chosen to appear here on Weekly Photo Tips will do so under your name with your bio and link(s) back to your website, blog, or other web presence.

So  please, send us an email with your idea and we promise to get right back to you.


Welcome to another Flicker Friday!...


This week we have images from "across the pond", by photographer Edward Dullard.

Please check out more of these stunning images over at Edward's Flickr stream or visit him at 500px.com.

Click on any of images to view larger.