In this video I talk about a flash/umbrella bracket that I did not purchase with the intension of reviewing, but after receiving (and using) it I wanted to share my thoughts about it.
Towards the end of the video I'll also share with you a different way to use it to help in feathering your light.
If you are interesting in purchasing one (or more) of these brackets you can get them for just $16.25 over at Adorama.
And for subscribers (as usual), videos do not get pushed through in your email so you'll need to come back to Weekly Photo Tips or head directly over to YouTube to watch it.
If there is a product you would like to learn more about, drop us an email and we'll do our best to review it for you.

Thank you Doug...

A couple weeks ago we featured UK photographer Doug Chinnery.
What I am holding in my hands is a little somethin' somethin' from Doug.
My wife and daughters have seen a bunch of photography/photographers and are not easily impressed but when I pulled this canvas from the box the word I heard was "wow".
I need more walls because there are a bunch of Doug Chinnery photographs I would love to hang in my house.
Be sure to stop by his website and take a look at his work, if you are from the UK you will want to look at his workshops as well.
D'oh!...
When I announced the Joel Grimes workshop I gave you the wrong dates.
The 2 day workshop will be held Saturday and Sunday April 17th and 18th (NOT the 16th & 17th). I have fixed the post but wanted to announce it as well.
Thanks to all the folks who emailed me to let me know the err of my ways.
Hope to see you there.

The 2 day workshop will be held Saturday and Sunday April 17th and 18th (NOT the 16th & 17th). I have fixed the post but wanted to announce it as well.
Thanks to all the folks who emailed me to let me know the err of my ways.
Hope to see you there.

Being inspired by Christopher Appoldt...

I spend a good deal of time looking at the work of other people, not because I want to copy what they are doing, but to get the creative juices flowing, to be inspired.
How others are using light, to see their posing techniques, and the kind of post processing they use will often spark ideas for new projects.
One photographer that inspires me is Christopher Appoldt.
I really like how he lights his portraits, how he photographs animals, and the wide range of subjects that he covers.
Both his work and his client list is pretty impressive, be sure to stop by his website and blog to see what he is up to and to be inspired.
Here are a few images from Christopher Appoldt, click on them to view larger and in a new window.


Mark April 17 & 18 on your calendar...
And not just because your taxes will finally be done.
These are the dates of a two day workshop that will be taught by Joel Grimes. This photographic learning extravaganza will be held in our new 2,000 square foot studio space here in Biddeford Maine.
WORKSHOP OUTLINE:
• Taking your creative vision to the next level
• Recognizing your greatest asset.
•Developing your personal vision.
•Promoting yourself as an artist, not a technician.
•Keeping up with the industry trends.
•The basic fundamentals of lighting.
•Breaking the established rules.
•Experimentation is the key to innovation.
•Hands on lighting demonstrations.
•Capturing the image is just the beginning.
•Mastering Photoshop is a necessity.
•Some tricks of the trade.
•Keeping it simple.
•Marketing, competing in today's marketplace.
For complete workshop details and to reserve your seat visit the workshop page here.


 Click on any of Joel's images to view larger and in a new window.
I'll give you double your money back...

I recently watched the movie (again), Taking Chance.
I implore you to watch this little known, seldom seen story about taking a fallen soldier home.
It's not pro war, it's not anti war... it is about honor, dignity, and respect and tells the story of the final trip home for those who have given it all because they were asked.
Chance Phelps died in Iraq in 2004 and this movie is about his final trip home.
I promise that if you rent this movie you will be moved, and if you're not, if you think it was a waste of your time simply drop me an email and I will give you back double what you paid to rent it. Becuase I think it's that important.
If you are a subscriber and don't see the video trailer pushed through, come back to the blog or view it on YouTube.
A fun layers exercise/tutorial...
I came across a Photoshop "cracked and peeling" tutorial and thought I would give it a whirl.
Now I realize that very few (okay more like none) of our clients would ask for this but it's a good way to try (and learn) new things and expand your Photoshop skills.
Here is the finished image (click on it to view larger):
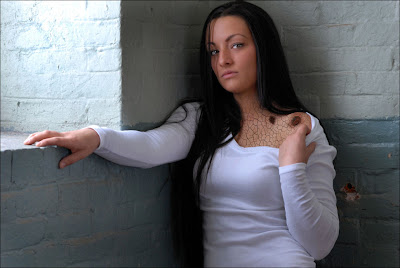
I took the original image -
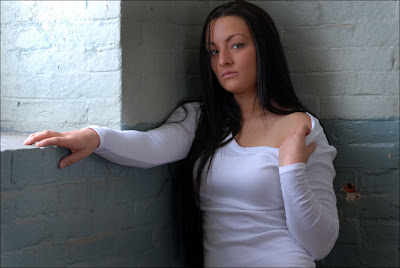
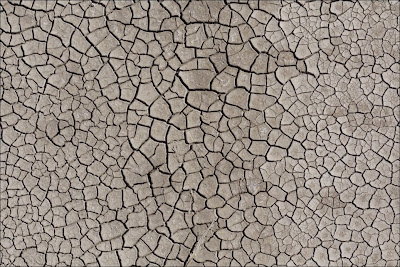
and using layer masks overlaid it with a dried mud texture -
then took a small piece from a rust texture -
 You can get these textures (and many more) for free over at CGTextures and you can walk through the step by step tutorial here.
Now I realize that very few (okay more like none) of our clients would ask for this but it's a good way to try (and learn) new things and expand your Photoshop skills.
Here is the finished image (click on it to view larger):

I took the original image -

and using layer masks overlaid it with a dried mud texture -

then took a small piece from a rust texture -
 You can get these textures (and many more) for free over at CGTextures and you can walk through the step by step tutorial here.
Giving your client a tattoo...
While doing a maternity shoot the "expecting" grandmother said, "wouldn't that look cool if he had a tribal tattoo" and while editing I looked at the shot and thought she was right.
So I applied the tattoo and emailed it to her, she was thrilled.

 (click on either image to view larger & in a new window)Below is a video tutorial on how it is done in just a few minutes, you can find another tutorial here, here, and here as well.
You can also find video tutorials on how to remove tattoos here and here.
And the winner is...
The winner of "The Evolution Collection with FLO" from Jed and Vicki Taufer is...
(subscribers - make sure you come back to the blog to view the video or watch it on YouTube because videos still are not pushed through with your subscription, sorry)
(subscribers - make sure you come back to the blog to view the video or watch it on YouTube because videos still are not pushed through with your subscription, sorry)
Happy Valentines Day...
In the spirit of the day, I hope you love and are loved... today and everyday.


Contest reminder, drawing on Monday!...

We just wanted to remind everyone that you still have time to enter our contest and win the 2009 product of the year.
Nothing for you to do but send us an email with your name so we can drop it into the bowl.
The winner will receive a package that will be transformative.
If you are thinking about becoming a professional photographer, or want to take your current studio to the next level "The Evolution Collection with FLO" will help get you there.
The random drawing will be held at 5pm eastern time on February 15th (this coming Monday) and the video of the winning name being drawn will be posted that night.
You can read all of the contest details here.
Good luck!
Ladies and gentlemen, Doug Chinnery...
I "met" Doug through this blog and was completely blown away with his landscape images and wanted to share him (and his images) with you.
So, without further delay, Doug Chinnery:
"I live on the edge of Sherwood Forest in Nottinghamshire, England – home of Robin Hood! In fact many of my images of trees are taken in the forest.
I have always taken photographs but got serious with the advent of digital photography, starting out with Canons 350D. I soon upgraded to the Canon 5d and then on to the 1ds mk2. I work with full frame cameras as my first love is landscapes.
I now am now more or less a professional photographer, selling prints of my images and shoot stock for Alamy and Getty. I shoot portraits, weddings (the most stressful thing I do!), commercial customers and now conduct my own workshops. I am also working on my first photography book.
I enjoy shooting landscapes but hold back from describing myself as a ‘Landscape photographer’, I prefer to think of myself as just a ‘photographer’.
Why photography? I just love being out and being creative. I enjoy very early mornings and being in the landscape alone or with good friends. I enjoy the experiences only early risers get of seeing our world at its very best. I also enjoy teaching and sharing knowledge, hence my workshops and my blog. I believe in freely spreading knowledge of locations and techniques. I find it hard to understand photographers who jealously protect their knowledge and seem to see other photographers as a threat.
The photographers I admire are David Noton, Joe Cornish and Charlie Waite. The standards they set give me something to work towards and aspire to."
His equipment:
"Canon 1ds mk2br>Canon L lenses - 16-35, 24-70, 70-200.
Plus the 100mm L Macro, f1.4 50mm and the 1.4x extender (I also use a Lensbaby Composer)
Lee ND Grad Filter system
Giottos Carbon Fibre Tripod with Manfrotto 405 Geared Head
I always use mirror lock, a hot-shoe level and a remote release.
I always shoot in RAW and process the images in Lightroom followed by dust spotting, levels and curves adjustments in Photoshop. I try to get the images right in camera so I have to do as little as possible on the computer. The exception to this is where I create artistic images using textures. For my black and white images I use Silver Efex Pro. The tip that has made the biggest improvement to my images has been to spend some time understanding the Histogram and ‘shooting to the right’. Most of the information in a RAW file is in the highlights end of the histogram – underexposing certainly makes the image more colorful and contrasty on the camera and computer screen, but you're missing so much data. Overcome being put off by seeing washed out flat images on the camera and trust the histogram. When you get back to the computer you can bring all that richness back with levels and curves and will end up with a much better image than if you had underexposed."
His images:
.jpg) "Walking in Golden Dreams"
"Walking in Golden Dreams"
I was in a bit of a dream when I shot this image. It was taken in Clumber Park, part of Sherwood Forest, and I visited the location probably 20 or 30 times before I got these conditions. It was a February dawn, a slight mist floated between the trees and as the low rising sun hit the mist it burst into liquid gold. I had just a couple of minutes of feverish activity to capture the scene. That year, the images I took became my best sellers by far. Settings – ISO 50, 280mm, f22, 0.8 seconds.
.jpg) "Eilean Donan Castle"
"Eilean Donan Castle"
This is probably the most photographed castle in Scotland, it is on a loch as you approach the bridge over to the Isle of Skye. My wife and I were on our return journey home after a weeks holiday on Skye. As we rounded the loch I could see the light was amazing. I was new to digital photography then but had the foresight to shoot seven images with my Canon 350D which I later stitched into this panorama. The light lasted five minutes before a storm hit and dissolved into rain. Settings - ISO100, 46mm, f10, 1/160.
.jpg) "When the way seems difficult"
"When the way seems difficult"
This is a lane in Northern Ireland near the village of Armoy. It is called locally, ‘the dark hedges’. I used a 70-200mm IS L zoom lens with the 1.4x extender for this image to compress the perspective and enhance the nature of the trees. Settings - ISO 50 at f16 for 61 seconds as the light was fading. I converted the image to B&W to focus the eye on the shapes and contrasts rather than being distracted by the colors. The square crop was used to enhance the symmetry of the image.
.jpg) "Runswick Bay"
"Runswick Bay"
This image was shot in the North Yorkshire coast this winter, before sunrise. I used the jetty as a lead in and centralized it to give a symmetrical image with a strong feel. I put on 5 stops of Lee ND filter and a 3 stop soft ND grad to balance the exposure. Settings - ISO 50, f18, 16mm for 83 seconds. This flattened the sea to a translucent sheet and captured the movement in the clouds. In this type of situation I often look for symmetry as this seems to work well with fine art images.
.jpg) "Bluebell Wood"
"Bluebell Wood"
This image took a lot of energy and willpower to get. It meant a 1am rise to drive for four hours to be in place for dawn. On the drive it poured with rain and I feared the drive was wasted. However just before dawn the rain stopped and mist started to rise. The bluebells were soaked in rain water – I got drenched to the waist moving through the wood. I used a long lens to compress the effect of the bluebells and a ND filter to hold back the dawn light pouring through the mist as it evaporated. After an hours shooting I was shattered, wet, cold and still had a long drive home, but the images were well worth it. In fact this image became my best sellers last year. Settings – ISO 50, 98mm, f11, 1/6 second.
.jpg) "St. Mary's Lighthouse"
"St. Mary's Lighthouse"
This was such a beautiful dawn, soft, gentle warm light bathed the lighthouse, again I used the causeway, which is covered at high tide, to create a symmetrical composition. Settings – ISO 50, 16mm, f16, 0.8 second – Lee ND grad filter.
(click on any of these stunning images to view larger, in a new window)
So, without further delay, Doug Chinnery:
"I live on the edge of Sherwood Forest in Nottinghamshire, England – home of Robin Hood! In fact many of my images of trees are taken in the forest.
I have always taken photographs but got serious with the advent of digital photography, starting out with Canons 350D. I soon upgraded to the Canon 5d and then on to the 1ds mk2. I work with full frame cameras as my first love is landscapes.
I now am now more or less a professional photographer, selling prints of my images and shoot stock for Alamy and Getty. I shoot portraits, weddings (the most stressful thing I do!), commercial customers and now conduct my own workshops. I am also working on my first photography book.
I enjoy shooting landscapes but hold back from describing myself as a ‘Landscape photographer’, I prefer to think of myself as just a ‘photographer’.
Why photography? I just love being out and being creative. I enjoy very early mornings and being in the landscape alone or with good friends. I enjoy the experiences only early risers get of seeing our world at its very best. I also enjoy teaching and sharing knowledge, hence my workshops and my blog. I believe in freely spreading knowledge of locations and techniques. I find it hard to understand photographers who jealously protect their knowledge and seem to see other photographers as a threat.
The photographers I admire are David Noton, Joe Cornish and Charlie Waite. The standards they set give me something to work towards and aspire to."
His equipment:
"Canon 1ds mk2br>Canon L lenses - 16-35, 24-70, 70-200.
Plus the 100mm L Macro, f1.4 50mm and the 1.4x extender (I also use a Lensbaby Composer)
Lee ND Grad Filter system
Giottos Carbon Fibre Tripod with Manfrotto 405 Geared Head
I always use mirror lock, a hot-shoe level and a remote release.
I always shoot in RAW and process the images in Lightroom followed by dust spotting, levels and curves adjustments in Photoshop. I try to get the images right in camera so I have to do as little as possible on the computer. The exception to this is where I create artistic images using textures. For my black and white images I use Silver Efex Pro. The tip that has made the biggest improvement to my images has been to spend some time understanding the Histogram and ‘shooting to the right’. Most of the information in a RAW file is in the highlights end of the histogram – underexposing certainly makes the image more colorful and contrasty on the camera and computer screen, but you're missing so much data. Overcome being put off by seeing washed out flat images on the camera and trust the histogram. When you get back to the computer you can bring all that richness back with levels and curves and will end up with a much better image than if you had underexposed."
His images:
.jpg) "Walking in Golden Dreams"
"Walking in Golden Dreams"I was in a bit of a dream when I shot this image. It was taken in Clumber Park, part of Sherwood Forest, and I visited the location probably 20 or 30 times before I got these conditions. It was a February dawn, a slight mist floated between the trees and as the low rising sun hit the mist it burst into liquid gold. I had just a couple of minutes of feverish activity to capture the scene. That year, the images I took became my best sellers by far. Settings – ISO 50, 280mm, f22, 0.8 seconds.
.jpg) "Eilean Donan Castle"
"Eilean Donan Castle"This is probably the most photographed castle in Scotland, it is on a loch as you approach the bridge over to the Isle of Skye. My wife and I were on our return journey home after a weeks holiday on Skye. As we rounded the loch I could see the light was amazing. I was new to digital photography then but had the foresight to shoot seven images with my Canon 350D which I later stitched into this panorama. The light lasted five minutes before a storm hit and dissolved into rain. Settings - ISO100, 46mm, f10, 1/160.
.jpg) "When the way seems difficult"
"When the way seems difficult"This is a lane in Northern Ireland near the village of Armoy. It is called locally, ‘the dark hedges’. I used a 70-200mm IS L zoom lens with the 1.4x extender for this image to compress the perspective and enhance the nature of the trees. Settings - ISO 50 at f16 for 61 seconds as the light was fading. I converted the image to B&W to focus the eye on the shapes and contrasts rather than being distracted by the colors. The square crop was used to enhance the symmetry of the image.
.jpg) "Runswick Bay"
"Runswick Bay"This image was shot in the North Yorkshire coast this winter, before sunrise. I used the jetty as a lead in and centralized it to give a symmetrical image with a strong feel. I put on 5 stops of Lee ND filter and a 3 stop soft ND grad to balance the exposure. Settings - ISO 50, f18, 16mm for 83 seconds. This flattened the sea to a translucent sheet and captured the movement in the clouds. In this type of situation I often look for symmetry as this seems to work well with fine art images.
.jpg) "Bluebell Wood"
"Bluebell Wood"This image took a lot of energy and willpower to get. It meant a 1am rise to drive for four hours to be in place for dawn. On the drive it poured with rain and I feared the drive was wasted. However just before dawn the rain stopped and mist started to rise. The bluebells were soaked in rain water – I got drenched to the waist moving through the wood. I used a long lens to compress the effect of the bluebells and a ND filter to hold back the dawn light pouring through the mist as it evaporated. After an hours shooting I was shattered, wet, cold and still had a long drive home, but the images were well worth it. In fact this image became my best sellers last year. Settings – ISO 50, 98mm, f11, 1/6 second.
.jpg) "St. Mary's Lighthouse"
"St. Mary's Lighthouse"This was such a beautiful dawn, soft, gentle warm light bathed the lighthouse, again I used the causeway, which is covered at high tide, to create a symmetrical composition. Settings – ISO 50, 16mm, f16, 0.8 second – Lee ND grad filter.
(click on any of these stunning images to view larger, in a new window)
California Sunbounce Micro-Mini review...
Last August I reviewed the California Sunbounce Pro and loved it for a few reasons, how well it performed, the quality workmanship, and the superior materials that are used in its construction.
Along comes the California Sunbounce Micro-Mini and it's the same great product and performance, just in a much smaller package.
For the last three weeks I have been shooting artifacts for a museum that will be used for both archival purposes as well as publication and almost every shot consists of three things, 2 lights and a Sunbounce Micro-Mini. It's small enough to get into tight spots and it does a big job.
Because of the design I have two reflective surfaces to choose from (soft or strong) and it's light weight and rigid frame allow me to easily hold it with one hand while shooting.
And it takes up very little (and precious) travel space, when broken down and in it's handy dandy travel pouch it takes up about as much space as a 30" shoot through umbrella.
Today not only do you get a review of a great product, but you also have the chance to win some cool (and useful) gear.
Bron Imaging Group, the American distributor for the California Sunbounce line of products, is currently holding their photography contest. The theme is an intimate portrait of the girl or boy next door.
The contest started February 1st and the winner will be announced July 1st.
1st place - broncolor Mobil A2R travel kit
2nd place - broncolor Minicom RFS Travel kit
3rd place will get you this very California Sunbounce Micro-Mini with the flash bracket
Back to the review, watch the video below and you'll see why I am so fond of the California Sunbounce Micro-Mini and why you should seriously consider adding it to your arsenal of light modifiers and shapers.
(subscribers - make sure you come back to the blog to view the video or watch it on YouTube because videos still are not pushed through with your subscription, sorry)
I've been living under a rock...
At least that's how it feels because everyone I have shown this video to has said the same thing... "seen it".
Even my teenage daughters!
I going to post it anyway, just so the three other people in the world who haven't seen it can be in on "the secret".
Of all the weddings I have photographed, I have never seen ANYTHING like this:
Even my teenage daughters!
I going to post it anyway, just so the three other people in the world who haven't seen it can be in on "the secret".
Of all the weddings I have photographed, I have never seen ANYTHING like this:
A readers question about textures...
Steve asked a question about yesterdays post, "I am wondering do you use this technique often? If so what kind of images do you mainly use it on?"
The answer is "only occasionally", it's a nice way to bring focus to your subject without using a vignette or edges. The best images to use them on (in my humble opinion) are "portraits".
I am a fairly recent convert to textures, it was after seeing Jed and Vicki Taufer at WPPI Boston and in Vermont, seeing how they used them - in a very subtle way that enhances the photo (not over power it).
Let me share three images from Vicki that made me a texture convert.


(Click on any image to view larger & see more detail. They'll open in new window.)
Free textures and how to use them...
Textures are like spices, when used correctly they really enhance the food, but too much (or used incorrectly) then it just doesn't work.
That being said, I really like textures and have accumulated a long list of sites that offer high quality, high resolution textures for free.
Here's part of my list:
1. CGTextures has some of the best (and most) textures I have seen offered by one site. They have both a free and a paid service. The free service allows you to download 15mb of textures every 24 hours.
2. TextureZ.com also offers a large variety of textures and does take donations that will help support their efforts.
3. Mayang's Free Textures has listed over 3,800 free high res, well categorized textures.
4. Texturise not only offers a large variety (and number) of free textures, but it is also one of the few sites I know of the allow you to use them for commercial purposes.
5. TextureKing, the name pretty much says it all.
6. The Roxor has over 80 high res paper textures. They also offer free fonts, brushes, icons, and more.
Below is a video tutorial on how to apply textures using Photoshop, as there is more than one way to do it, you will find other (really well done) video tutorials here, here, here, and here.
Cinefoil review part 2, return of the dark stuff...
I wanted to follow-up on yesterdays review of Rosco Cinefoil with another way we used it.
We were shooting some product shots for a local company, Mad Gab's, that would be used for their catalog.
The shoot was done on white seamless as all of the images would be cut out, and using the lighter color paper would make that process easier.
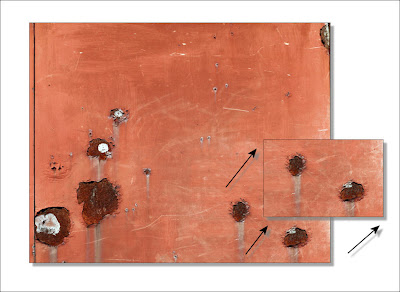
A problem arose when we were shooting some boxes that had a highly reflective finish. The side of the box was reflecting back the white paper (see image #1).
Se we slid a small piece of Cinifoil under the offending side of the box and it killed the reflection allowing the vibrant color of the box to come through (see image #2).
The image was then cutout in Photoshop and it was ready for the catalog (see image #3).
You may want to seriously consider adding Cinefoil to your arsenal of light modifying tools.
We were shooting some product shots for a local company, Mad Gab's, that would be used for their catalog.
The shoot was done on white seamless as all of the images would be cut out, and using the lighter color paper would make that process easier.
A problem arose when we were shooting some boxes that had a highly reflective finish. The side of the box was reflecting back the white paper (see image #1).
Se we slid a small piece of Cinifoil under the offending side of the box and it killed the reflection allowing the vibrant color of the box to come through (see image #2).
The image was then cutout in Photoshop and it was ready for the catalog (see image #3).
You may want to seriously consider adding Cinefoil to your arsenal of light modifying tools.


 (click on any image to view larger and in a new window)
A lighting toolbox "must have"...
In yesterdays video Scott Kelby he showed how to use a "Flag" to control the amount of light (negative fill) that came out of a softbox and lit his subject. If you didn't watch the video yet, you might want to view it here before moving on.
What I want to share with you today is an alternative that is less expensive, more versatile, and significantly more portable.
It's Cinefoil from Rosco.
Cinefoil is a heavy duty aluminum foil that is painted flat black on both sides that can used as a flag, barn doors, and more (come back tomorrow and we'll show you more).
It's not very expensive, a roll of 12" x 50' is $32 and a roll of 24" x 25' is $29, but because it is heavy duty a piece can last you a long time. The two pieces you see me use in the video below have been used over and over again. They are the only two pieces we have pulled of the roll since we bought it a couple months ago and they are standing up just fine to all the work we've put them through.
See you tomorrow with another use for Cinefoil, the "Duct Tape" of lighting.
If you are a subscriber then you know the drill, videos are not pushed through with your subscription so either return to the blog to see it or watch the video on our YouTube channel.
Subscribe to:
Posts (Atom)