We have finally finished compiling our list of camera clubs throughout the country, all 617 of them.
Belonging to a camera club was one of the essential building blocks in my photography education and something I would strongly recommend to every aspiring photographer.
Which is the point of this blog entry, camera clubs have a great deal to offer, they are filled with wonderful people, and if you are looking for a camera club we would like to help. Simply drop us an email with your city and zip code and we will respond with a list of all the clubs in your area.
Just in case you are wondering why we just don’t put the information here for you to search on your own, we couldn’t figure out how to post it and keep unscrupulous web leaches from stealing our hard work and pounding the camera clubs with spam.
So, join a camera club and broaden your photographic horizons, and if you should need some help finding one, send us an email!

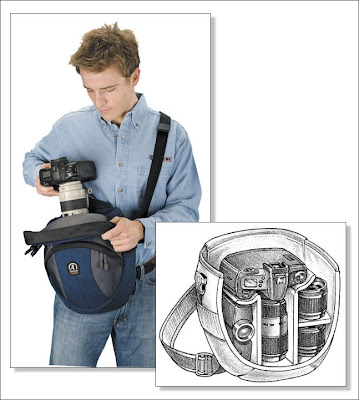
My new Tamrac sling pack bag...
I have mentioned more than once that I shoot weddings and one of the things that I have been searching for is a camera bag/system to use while I shoot.
If you have shot a wedding (or almost any fast moving/fluid event) you know you don't have time to run back and forth to your camera bag to swap cameras, grab batteries, or flash cards. You need to have your "tools" with you, in arms length.
It would be embarrassing to tell you how many different things I have tried (and how much money I have spent) in an effort to have my tools close at hand. I shoot with two cameras (one with a 17-50 lens, the other with an 80-200), a flash, batteries, flash cards, lens cloth, etc.
The last thing I tried (and I thought held the most promise) was a belt system. What a disaster! The first problem was that there was no place that would hold my second camera, so my unused camera hung around my neck not only getting in my way but also banging into things (like it was magnetized to every hard item within 10 feet). The belt compartments were not easily accessible and I am sure that the wedding guests did not appreciate the "plumbers crack" this heavy belt kept trying to produce. I could go on with the belt system problems but will leave you with that last unpleasant mental picture.
My frustrations came to an end when I got a Tamrac Velocity 8x Sling Pack. This is exactly what I have been searching for and have been singing its praises to my photography friends ever since.
Let me share with you just some of the things that made me fall in love with this bag:
1. It hangs comfortable (and securely) on my shoulder with a wide strap that does not dig in (and is easily adjustable).
2. It holds everything I need (second camera, flash, lens, etc.).
3. The bag slides around (and stays) on my back, out of the way, until I need it.
4. The bag opens AWAY from me, so I have easy access to my gear and I'm not fighting to get over the top of the bag to get inside.
5. It has a zipper and two buckles that hold the cover in place, when I shoot I use just the two buckles, this speeds access to the contents while still holding the top firmly closed (and my gear inside).
6. The accessory compartments were designed with easy access in mind, and the design works wonderfully.
7. No buttocks cleavage!
The Velocity 8x Sling Pack is a beautiful bag, thoughtfully laid out, with outstanding functionality and of the all the "pro" sling packs I looked at, it is the most reasonably priced (about $69 street price).
If you are a NAPP member B&H Photo will give you free shipping, saving you even more.
So if you are looking for a shooting buddy that will carry its own weight, you need to look into getting a Velocity 8x Sling Pack.

Kubota Imaging outdoes themselves…
About two weeks ago I wrote about the Kubota Lightroom DVD, at the time I called it “the best Lightroom training DVD I have ever seen”.
Well, it's now the second best DVD, as Kubota Imaging has "sweetened the pot" by releasing an updated version of the Kubota Lightroom DVD.
One of the updates is that they have bundled the 36 Lightroom presets that used to be sold separately AND have added 12 new ones! (for those who don't want to break out their calculator like I did - that gives you a total of 48 presets).
;)
Of the new presets there is one called "Old Film" that is gorgeous and comes in 4 different variations.
They have also released Kubota Artistic Tools Volume 4 which you will be reading more about on this blog in the near future.
Beautiful Portraiture...
While surfing the internet I found myself at the website for the Professional Photographers'Association of Pennsylvania, their home page featured an image of one of their members.
When I saw it I thought to myself (as apposed to actually saying it out loud like people do on TV) "This is what portraiture should be, this is beautiful".
So I contacted the photographer and asked if I could share the image (and a little bit of her) with you good people, to which she graciously agreed.
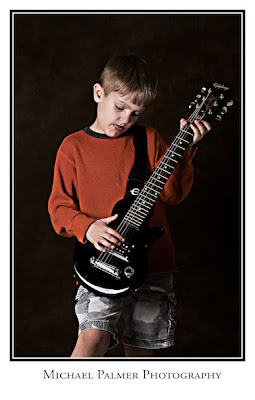
Here goes, world this is photographer Carmen Bike, Carmen this is the world:
Where was the image taken?
On a stairwell landing in my studio, lit by a north facing window.
How did the image come about?
I think in this business it is just a matter of being aware and present. I placed him by the wall and told him to wait while I got my composition and focus set up. In his waiting, I saw that he looked perfect so I took it.
Equipment (camera, lens, lighting, etc)
Fuji S2 F2.8 @ 180 ISO800 Tamron 28 – 75mm 2.8 at 48mm
Natural north facing window light on the left and a 40’’ silver reflector on the right.
Post production work (what was done and software used)
Shot in raw and converted to 8 bit tiff using Fuji’s Hyper Utility SW.
Taken into Photoshop 7 where minor retouching was performed (brighten the eyes and minimize circles under the eyes, toned down the brightness of his shirt).
Converted to sepia using an action I wrote.
How did you get into photography/how long have you been a photographer?
I was my families photographer as a child but it was not a vocational interest for me. I followed my scholastics skills into an engineering career. My former spouse had a significant photographic hobby and when he started turning down job opportunities because he wasn’t interested, I picked up the camera. That was 17 years ago. My specialties are children, family's, and anything where people are interacting with each other. For fun I photograph nature. For my sessions I give the client what they want but I might respectfully request an image that is “for me” something that I see in them that is not necessarily what they were looking for, but usually it's something they like it.
If you would like to learn more about Carmen or see her her work, be sure to visit her website.
To view a larger version, click on the image and it will open in a new window.
 "The Candidate"
When I saw it I thought to myself (as apposed to actually saying it out loud like people do on TV) "This is what portraiture should be, this is beautiful".
So I contacted the photographer and asked if I could share the image (and a little bit of her) with you good people, to which she graciously agreed.
Here goes, world this is photographer Carmen Bike, Carmen this is the world:
Where was the image taken?
On a stairwell landing in my studio, lit by a north facing window.
How did the image come about?
I think in this business it is just a matter of being aware and present. I placed him by the wall and told him to wait while I got my composition and focus set up. In his waiting, I saw that he looked perfect so I took it.
Equipment (camera, lens, lighting, etc)
Fuji S2 F2.8 @ 180 ISO800 Tamron 28 – 75mm 2.8 at 48mm
Natural north facing window light on the left and a 40’’ silver reflector on the right.
Post production work (what was done and software used)
Shot in raw and converted to 8 bit tiff using Fuji’s Hyper Utility SW.
Taken into Photoshop 7 where minor retouching was performed (brighten the eyes and minimize circles under the eyes, toned down the brightness of his shirt).
Converted to sepia using an action I wrote.
How did you get into photography/how long have you been a photographer?
I was my families photographer as a child but it was not a vocational interest for me. I followed my scholastics skills into an engineering career. My former spouse had a significant photographic hobby and when he started turning down job opportunities because he wasn’t interested, I picked up the camera. That was 17 years ago. My specialties are children, family's, and anything where people are interacting with each other. For fun I photograph nature. For my sessions I give the client what they want but I might respectfully request an image that is “for me” something that I see in them that is not necessarily what they were looking for, but usually it's something they like it.
If you would like to learn more about Carmen or see her her work, be sure to visit her website.
To view a larger version, click on the image and it will open in a new window.
 "The Candidate"
SlideShowPro for Lightroom...
If it has not been obvious from my previous posts, let me make it clear right now, I LOVE LIGHTROOM!
But if there is one area where Lightroom is weak, it's in the web presentation module. Getting your images to the web has meant more work, more time, and more money.
It involved the extra steps (and time) of moving the images out of Lightroom then moving them into another program, the added expense of purchasing that program, and finally there is the learning curve involved so that your slideshow doesn't come out looking like it was created in some high school html class.
Well, those days are have officially come to an end.
SlideShowPro for Lightroom is an answer to my prayers (and probably yours as well). It is a plug-in for Lightroom, which means you are working directly within the Lightroom interface so everything looks and feels familiar (and comfortable).
SlideShowPro is an easy to use, yet very powerful plug-in. You can use it right "out of the box" without changing a thing (it comes with 32 different templates) to create your slideshows or take control of every aspect of how your images will be displayed, right down to how many pixels wide the borders of your thumbnails will be (and what color they will be).
You can also customize just the settings you want and save it as one of "your very own" templates. You also have the option of having a single slideshow or having a gallery of multiple slideshows, again, how many slideshows in your gallery is all up to you.
For me the "ease of use" test is how far can I go without being forced to read the documentation, SlideShowPro passed that test, here is my effort.
It was only after I created my slideshow that I looked at the documentation and was blown away the true capabilities of this gem.
And if you are like me, you've bought at least 2 or 3 programs looking for the right one (and you know how much they can cost), stop wasting your money, for a mere $25 purchasing SlideShowPro will be the best money you will spend so far this year.
So take a minute and look at SlideShowPro, here is the quick start guide, and the full documentation.
I LOVE SLIDESHOWPRO!

Take a look at this...
Mike Palmer tried the "Dave Hill" technique that I posted last week and was kind enough to share it with me (and you).
Well done Mike.
Well done Mike.

Adobe releases Lightroom & Camera RAW updates...
On Friday (March 14th) Adobe released version 1.4 of Lightroom. This update adds more cameras as well as addresses a MAC printer driver compatibility issue.
The updates is available in two delicious flavors:
Windows version here.
MAC version here.
Adobes other release was version 4.4 of Camera RAW. This is available in the same two flavors:
Windows version here.
MAC version here.
The updates is available in two delicious flavors:
Windows version here.
MAC version here.
Adobes other release was version 4.4 of Camera RAW. This is available in the same two flavors:
Windows version here.
MAC version here.
More Dave Hill stuff....
For those of you who did not get enough Dave Hill in the last post, here is some more.
Scott Kelby had a recent post where he demonstrates two techniques, one in Photoshop and the other in Lightroom, that will give you a very nice "gritty" effect/look. Be sure to check them out.
Also, David Hobby (aka STROBIST) had a Q&A with Dave Hill and was kind enough to share it with us (his readers). It's a good read, so take a minute to read it.
Lastly, under the rules of full disclosure, the "Dave Hill" technique that I shared with you came from Omar Casasola, he was kind enough to share it with folks (like me and you) on flickr. Thank you Omar.
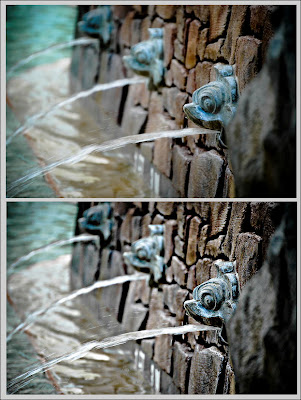
That Gritty Dave Hill Look...
If you have not seen the work of Dave Hill you need to, take a minute and look at his incredible images.
Now to imply that the technique I am about to show you is "just like Dave Hill's" would be a like saying my child worn minivan was like a Ferrari. The only similarities is that they both of license plates, after that all similarities ends.
Though chicks do love my minivan, as it is the "sport" version.
;)
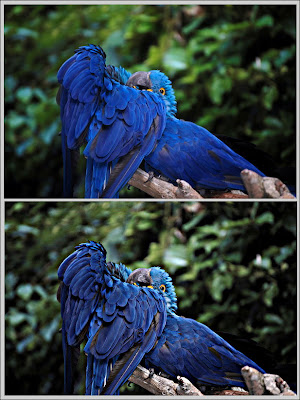
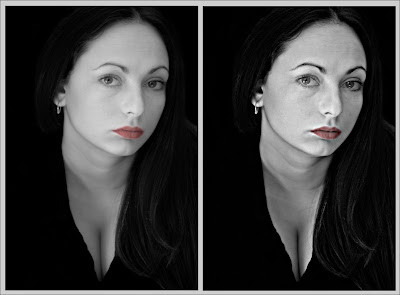
Anyway, the technique I am going to show you will give your images a cool gritty look and works on most images, but works best on high key images. Below are four examples (though I could not get my hands on a high key image and wanted to get this post done). After you do it a couple times it will take you about a minute to apply.
So here goes:
Step 1:
Open your image in Photoshop and create a duplicate the layer.
Go to "Filter" - "Other" - "High Pass" set the Radius to 4 Pixels.
On the Layers palette select the "Vivid Light" blending mode.
Flatten the image.
Step 2:
Create a duplicate the layer (again).
Go to "Filter" - "Other" - "High Pass" set the Radius to 7 Pixels.
On the Layers palette select the "Color" blending mode with an opacity of 40%.
Flatten the image.
Step 3:
Create a duplicate the layer (one last time).
Go to "Filter" - "Blur" - "Gaussian" set the Radius to 9.5 Pixels.
Go to "Filter" - "Noise" - "Add Noise" set Amount to 3%.
Got to "Layer" - "Layer Mask" - "Hide All"
Now use the lasso tool and select only the eyes (assuming the image has eyes, formultiple selections hold the shift key).
Go to "Select" - "Refine Edges" - set "Feather" to 5-6 pixels, then "Select" - "Inverse"
Select the brush on your tool palette, set the brush opacity to 30% and brush over the entire image once.
Flatten the image.
Step 4:
Go to "Filter" - "Sharpen" - "Unsharp Mask" and use the following settings:
Amount 100%
Radius 30.0 pixels
Threshold 0 Levels
That's it, enjoy.
If you click over any of the images below they will open in a new window and larger so you can have a better view of the effect on each image.

Now to imply that the technique I am about to show you is "just like Dave Hill's" would be a like saying my child worn minivan was like a Ferrari. The only similarities is that they both of license plates, after that all similarities ends.
Though chicks do love my minivan, as it is the "sport" version.
;)
Anyway, the technique I am going to show you will give your images a cool gritty look and works on most images, but works best on high key images. Below are four examples (though I could not get my hands on a high key image and wanted to get this post done). After you do it a couple times it will take you about a minute to apply.
So here goes:
Step 1:
Open your image in Photoshop and create a duplicate the layer.
Go to "Filter" - "Other" - "High Pass" set the Radius to 4 Pixels.
On the Layers palette select the "Vivid Light" blending mode.
Flatten the image.
Step 2:
Create a duplicate the layer (again).
Go to "Filter" - "Other" - "High Pass" set the Radius to 7 Pixels.
On the Layers palette select the "Color" blending mode with an opacity of 40%.
Flatten the image.
Step 3:
Create a duplicate the layer (one last time).
Go to "Filter" - "Blur" - "Gaussian" set the Radius to 9.5 Pixels.
Go to "Filter" - "Noise" - "Add Noise" set Amount to 3%.
Got to "Layer" - "Layer Mask" - "Hide All"
Now use the lasso tool and select only the eyes (assuming the image has eyes, formultiple selections hold the shift key).
Go to "Select" - "Refine Edges" - set "Feather" to 5-6 pixels, then "Select" - "Inverse"
Select the brush on your tool palette, set the brush opacity to 30% and brush over the entire image once.
Flatten the image.
Step 4:
Go to "Filter" - "Sharpen" - "Unsharp Mask" and use the following settings:
Amount 100%
Radius 30.0 pixels
Threshold 0 Levels
That's it, enjoy.
If you click over any of the images below they will open in a new window and larger so you can have a better view of the effect on each image.


One last camera club beauty...
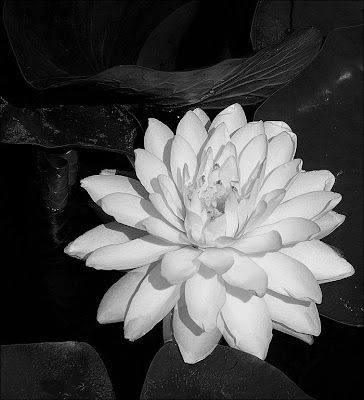
This last image is from Mary Rynes, a member of the Cleveland Photographic Society.
This black and white of a water lily was taken in July 2007 at the Children’s Garden which is part of Cleveland Botanical Garden.
The Children’s Garden was approached as part of the Cleveland Photographic Society's "Cleveland Project" - a photo tribute to Cleveland, its landmarks, & its people. One ambitious club member set out to re-trace, wherever possible, the sites of Margaret Bourke-Whites images.
A portion of the Cleveland Photographic Society's "Cleveland Project" was shown twice in Cleveland City Hall.
A little "something about Mary":
"I am an amateur who can’t force herself to so much as read the camera manual. I rely on automatic focus and have saved tons of once-wasted film (I love film and miss it) by going digital. I do have a wonderful camera selected by my husband who is the real photographer. He chose a camera which would allow me to use our old lenses and I tend to use the close-up option for all its worth. I had carried my husband’s camera for him until the late nineties. He foolishly left it in my care while he went to fetch more film; along came a butterfly, and that was that. I still mostly point & shoot and rely on the skill and cleverness of the camera."
The image was taken with a Konica Minolta 5D and a Tamron zoom lens 28-200 3.8-5.6 macro @ at fa ocal length of 200.
Mary used Photoshop Elements to convert to gray scale, crop and enhancing brightness, contrast and color.

The best Lightroom training DVD I have seen...
I just finished watching "Kubota RAW workflow for Lightroom" from Kevin Kubota and all I can say is WOW!
Well, actually there is much more I can say, so here goes:
First, the DVD title does not accurately represent all of the information that you will be getting. Before you you get into serious Lightroom techniques Kevin first takes the time to show you the folder/file technique he uses for his own clients on his own hard drive. I thought the system that I had in place was pretty cool, but after seeing what Kevin had to offer, mine has been scrapped and replaced with what he taught me.
Kevin's folder structure and how he stores his files works and blends seamlessly with the client database he uses for his own photography business, as I was watching him demonstrate how it worked all I could think was "Man, this is exactly what I have been looking for" and just as that thought cleared the front of my brain Kevin announces that the viewers of the DVD can download the database for FREE!
Let me share with you just a little bit about the database, first, it runs without an installer which means you can copy it to a thumb drive or external hard drive (and run it from there if you want) or burn it to a CD and move it to another computer and it will work perfectly. It is searchable in about any way you can imagine (name, date, type of shoot, keywords, etc.) and it also comes with all kinds of workflow checklists. It will keep track of where on the computer (or network) that clients files are stored, it will tell you if a backup CD was made, if the images were edited, proofs have been completed, or have been uploaded to the web, it will also tell you who in your studio completed these tasks and remind you to send a thank you note to the client. This is just some of what it can do.
As you can imagine this database has also been incorporated into my new "Kevin Kubota" workflow.
This DVD costs $79 dollars and had it ended there, I would have considered it money VERY well spent and gladly have given Kevin a full mouth kiss to boot, but this was just scratching the surface of what was to come.
Next Kevin walks you through setting up your Lightroom preferences - not just telling you which of the default settings should be changed to optimize your workflow, but why - so you will know AND understand why your Lightroom settings are what they are. Kevin also takes the time to explain all the preferences that are being left to the factory defaults.
By the time the section on preferences is completed you fully realize that it's about optimization, speed and efficiency, but never at the cost of quality. It's about increasing your productivity, increasing your studios revenue while giving the client the best product possible.
There is a chapter/section on presets, so that as your proficiency and artistic Lightroom skills improve, you can create your own presets, but I bought the Kubota Lightroom Presets (they sell for a mere $20) and have been using them for some time, they're far better than anything I could have put together myself.
When I saw the chapter title on "file management, importing and editing", I thought to myself that "Heck, I've been importing images into Lightroom for some time, what's the big deal", well, the big deal is that Kevin will show you how to do it in a way that anyone who wants to run a professional studio should do it. I learned Kevin knows WAY more than me. And I am sure neither he or you are surprised by that last statement.
There were two things I learned in this chapter that I thought outstanding, one was how to get the images in correct chronological order when they have been shot in two different cameras whose clocks had not been synchronized, (way cool as I shoot weddings with two cameras and this has been a problem in the past) and the other was how to use the color labels to flag images in a way that will optimize your workflow later.
As you browse through the images the first time, flag the images you'll want to convert to black & white with say a yellow flag, those you'll want to tweak with a red flag, etc... what a great idea/tool for sorting and batch processing these images later. Talk about time saving!
Kevin goes through each of the Lightroom modules in detail, but I'll stop at this point so that when you get your copy of "Kubota RAW workflow for Lightroom" there will be plenty of "knowledge bombs" to shock and awe you.
This DVD is just over three hours of "Lightroom altering" videos, a printable Quick Start guide, 116 page workbook and many online resources that add and expand upon the information Kevin provides. So if you are serious about using Lightroom as part of photographic workflow, this DVD is not a "want", it's a "must".
There have been seminars and training DVD's where the only thing I learned was that the instructor was smart, but none of their knowledge made it to the students. Kevin has a great teaching style, he does not seem to take himself too seriously, but he is serious about sharing with us what he knows (which is a great deal).
And you really can't ask for more than that. Thank you Kevin Kubota.
Go here to learn more about Kevin and see some of his beautiful images, or here to learn more about his workshops.
An exciting announcement!... Our Photo Contest!
We're excited here at Weekly Photo Tips to announce our new monthly photo contest!
The rules are pretty simple:
1. Each contest will begin on the first day of the month, end on the last day of that month, and the winner will be announced within a week of the contest closing.
2. Anyone can enter.
3. The category is "Open", send us an image of anything you want.
4. One image per person per contest.
5. Email us your image and information about it:
• Where the image was taken
• how did the image come about
• Equipment (camera, lens, lighting, etc)
• Post production work (what was done and software used)
6. Please keep the emailed image size to 300k or less.
That's it! Pretty simple.
We often receive some pretty cool and useful goodies to review (books, instructional DVD's, photography accessories, etc.) and we are going to share them with our contest winners.
We do have one question that we'd like your help with, should we create a Weekly Photo Tips flickr group for folks to upload their images to, where all the images that are entered can be shared with everyone? Please let us know what you think.
So, email us your image and let the contest begin.
Subscribe to:
Posts (Atom)