The one, the only, Mr. Dave Hill...

I was made aware of this video via Strobist and was so blown away I wanted to make sure you folks saw it.

From Dave - "All 11 images of the Adventure Series are deconstructed. I had to flatten a lot of the layers, but at least you can get an idea of what goes into each image."

Check this out:


Here is a link to our post on creating the "faux" Dave Hill look.

(subscribers will need to follow this link to see the video on Dave's Vimeo channel)

Bad Photoshop...


There has been another round of badly Photoshopped images in the news the last few days.

This image was released from the North Korean (state run) news agency showing victims walking through a "flood".

Two things wrong with this image, the water does not wick up their pants, they remain absolutely dry right to the water line AND the blending of the people to the water is HORRIBLE.

It is theorized that they (North Korea) released the image as "news" hoping for different flood, one of international aid.

If you follow this link you can read the story (and see the image) that cost an Associated Press freelance photographer his job (and credibility). What did he do? He used Photoshop to (badly) remove his shadow from an image he took of children playing soccer.

It seems that folks get caught because they do such a bad job of using Photoshop, which makes you wonder how many "good" edits never get caught.

Don't get me wrong, I use Photoshop, but I don't pass my images off as news, nor do I claim them to be unaltered.

Making lemonade out of lemons...

Many people would agree, if you want to learn how to take pictures, one of the best books to do it with would be Bryan Peterson's book "Understanding Exposure".

Bryan is an outstanding photographer and equally as good as a photography teacher.

Below is a 3 minute video, in it Bryan uses 5 very simple things combined in one of the unlikeliest of places to make a very good photograph.

If you find this video interesting (and you will), you'll want to check out this video using strawberries, or this one with cooking oil.


Lightroom 3 training - 3rd time is still a charm...

(this is a repeat of the most popular blog post in the history of Weekly Photo Tips, and as folks often write in with Lightroom questions I thought it would be worth posting again)

Ever go to a movie sequel with high expectations because the original was so good, but when it was over you left shaking your head?

The Kevin Kubota Lightroom training trilogy does not fall into this category, his is more like the Toy Story trilogy, where it builds beautifully on what came before it.
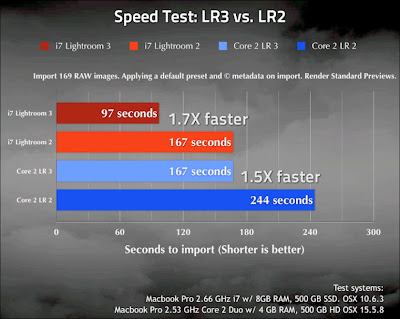

Over the weekend I watched Kevin's e:Class "Update Your Workflow with New Lightroom 3 Features" and as is his teaching style Kevin walks you through new features, tips, and tricks in an easy to follow, easy to understand method.

We have reviewed his previous Lightroom training DVD's in the past (Lightroom 1 here and Lightroom 2 here) and LOVED them both so the bar had been set pretty high and this Update Your Workflow e:Class measured up to it predecessors.

One of the things I like about Kevin is that he throws in some extremely useful information that is unrelated to Lightroom, but adds value to my life as a photographer.

Two examples:

1. He suggested that you put your name, telephone number, and (in big letters) "Reward if Found" on your memory cards. As soon as I heard it I sat up in my chair and thought (out loud) "Brilliant".

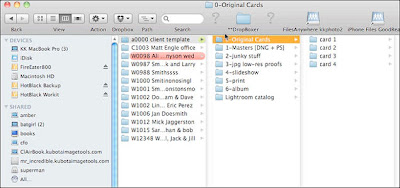
2. The file and folder structure (how he stores images on his hard drive) has been revised and improved. I have used his technique as part of my workflow since version 1 and in this latest offering Kevin shares with us what's new, different, and how it's setup so that it can easily (and should be) incorporated into your workflow.
The Update Your Workflow e:Class is just that, an update where Kevin demonstrates how to use the the important new features in Lightroom 3, it is NOT a complete Lightroom workflow instructional class from soup to nuts (more on that later).

The things you will learn are how to import your images with some of the new options available in Lightroom 3 that will speedup and automate your workflow.

You will see how to use the tethered capture feature in a photo booth scenario when shooting events that will increase your sales opportunities.

With so many of the new cameras allowing us to shoot with a higher ISO setting you will learn how to setup smart collections to separate and categorize your images based on their shot ISO so that you can then apply automated standardized noise reduction appropriate for the images ISO.

You will learn how to best use the Watermark tool and the secret you need to know if your watermark includes a graphic.

And there's more, much more, in this 1 hour and 15 minute download but I think you're getting the point.

Here's your choices - you can spend endless hours editing your clients images, struggling with features you are unfamiliar with (or miss them because they are unknown to you) or you can give your clients the best images possible photo while spending less time sitting in front of your computer (and more time watching Toy Story).

As I mentioned before this is an update for Lightroom 3, if you own the Kubota Lightroom 2 training DVD this is all you will need to get up to speed (and master) the new features in Lightroom 3 and it can be yours for just $39.

If you are starting from ground zero and really want to master Lightroom 3 you can get the complete workflow training DVD AND the Kubota Lightroom preset collection for just $99.

And if you own either the Lightroom 1 or the Lightroom 2 workflow DVD's you can upgrade to the Lightroom 3 Workflow DVD with presets for $49 and $39 (respectively).

It happened again, we made another list!...


This week there was a posting over at E-Junkie titled "A Collection Of Top 33 Photography Blogs" and Weekly Photo Tips made the list.

I share this with you folks not to brag, but to say thank you for making us what we are and to give you a link to the post because there are some really incredible photography blogs listed and you will want to check them out.

So.... THANK YOU!

Review of the UltraStrap from LumiQuest...


We had the pleasure of taking the new UltraStrap from LumiQuest for a test drive and loved it.

It's the first tensioning strap we have used and as far as we know, the ONLY tensioning strap on the market.

I can't tell you what a difference it makes when you apply it to your flash head, it goes on easier and stays on more securely (it will hold up to 3 pounds).

I am sure everyone out there has experienced their softbox "creeping" down so that in no time it's pointing towards the floor instead of your subject. During a shoot you need your tools to work well, you don't want to keep adjusting it or having to apply gaffers tape to help it do its job.


The UltraStrap is inexpensive ($7.95 with free shipping), and very will made so you will own it (and use it) for a very long time.

The sign of a good product is when we get one for review, then after trying it going out and buying more, the UltraStrap is one of those products.

Below is a quick (1 minute) video review, if you are a subscriber you'll need to return to the blog or head directly to our YouTube channel to watch it.


Another great learning opportunity...


Over at "Learning Food Photography and Food Styling" they recently announced their "31 Days of Food Photography Tips".

Before you say "but I don't shoot food", that doesn't matter, you will learn lighting, you will learn styling, and you'll learn techniques that will be applicable to any kind of photography you may practice.

Each of the 31 posts will have a related assignment, along with special weekly assignments.

You will be encouraged to share your assignment photos on their Facebook page and there will even be prizes given to randomly selected participants.

They are a week into this project so don't wait, head right over and sign up for this 31 day learning opportunity.

Being nice, there's an app for that...


It's the weekend, which regular readers know is my excuse to run (way) off topic.

If the idea of performing a random act of kindness is appealing but you have a hard time coming up with what to do there is an app that can help you out, it's called "DoGood" and runs on the iPhone, iPod, or iPad.

Each day a new "act of kindness" is displayed on your screen, once you've completed it you hit the "done" button and your good deed is shared with other "do-gooders".

If this sound interesting you can get more information here, you can also check out their website here.


Another great DIY resource...


If you are familiar with Scott Kelby, Kelby Training, or DTown TV you've probably seen Larry Becker.

He appears to be a quiet behind the scenes kinda guy but I am sure he is a driving force behind what is going on ("speak softly but carry a big stick" comes to mind).

Well Larry does a segment on DTown called "Cheap Shots" that are low cost, no cost, and do it yourself projects for photographers.

He also has a site "Larry's Cheap Shots" that you will want to visit (and bookmark).

Need a low cost idea for foam padding? How about an inexpensive flash diffuser, or a Speedlight softbox? This white seamless solution (I thought) was brilliant.

Larry is another great resource in the Kelby stables, so check out DTown TV and Larry's Cheap Shots for some great ideas.


A free Speedlight eBook just for you...


There are some photographers that I follow closely, they speak, I listen. Lou Jones is one of those photographers.

He recently released a free eBook on speedlights and I wanted to share it with you.

In it Lou talks about the mobility of small lights, modifiers to use with them, remote triggers, mixing speedlights with available light, and more.

There are 8 sample images included as well, all with different lighting scenarios and each presenting its own unique lighting challenges. The last part of the eBook has complete and detailed lighting diagrams for each of the sample images that show how it was lit and what equipment was used to make it all happen.

One thing that was so simple and so ingenious (that it blew my socks off) was using a simple 99 cent a-clamp as light stand. Can't tell you how many times I've run out of flash brackets or what I did have did not work for what I was trying do and an a-clamp would have worked perfectly.

Great stuff.

To get your free copy of "eBOOK: SPeeDLIGHTS" by Lou Jones all you need to do is head over to his blog and sign up for his newsletter. Pretty simple.

Though it was produced with the Nikon Speedlights it isn't brand specific, if you use Canon (or any other) small flash the principles and tips in the eBook are applicable.

50 free workflow actions for Photoshop...


Sure there are plenty of free Photoshop actions out there, but so many are not worth the effort of installing them.

Not true with this set of "50 Free Essential Workflow Actions for Photoshop".

I have "known" Stuart Little for many years, he has been a teacher and a Photoshop developer for a long time. The first actions I ever used were developed by Stuart and have been extremely happy with everything I have ever bought from him (which is just about everything in his store).

Now, back to the workflow actions.

Want to prep an image to post on Facebook? There's an action for that, how about posting images on your blog, yup, actions for that too. You can crop, rotate, re-size, apply a filter, convert to black & white, copy a layer, and so much more.

And not only do you get these great actions, they come with the "Power Panel" that contains all 50 actions as well as the most popular (and useful) Photoshop tools that will further speed up your workflow.


If you don't want to install the panel you can "buttonize" the actions to make them work with a single click.


But wait, there's more! You can watch video tutorials on installing the actions, installing the Power Panel, and demos of the actions themselves right here. Or you can skip all that and go directly to the download page (but I wouldn't recommend it, why miss out on some free education).

These actions are developed for CS3, CS4, and CS5, if you use an older version of Photoshop you can get free Stuart Little actions for older Photoshop versions here.

Stuart is a great teacher and you can find a ton of resources (like his Lightroom master class) at his website.

(click on any image to open view larger and in a new window)


Just 36 hours left on this great deal...


I have NEVER given the gift of photography (prints, canvas, books, etc.) and not had it be a rousing success (and on occasion help get me out of the dog house), which is why I try to share deals with other photographers as I learn of them.

Here is another.

Groupon is offering $115 worth of custom-designed photo books from Photobook America for just $35, that's a 70% savings!

The catch is you have just 36 hours to follow this link and get in on the savings.

Thank you, thank you, thank you...


I want to thank everyone for the comments, your thoughtful emails, and all the well wishes.

The daughter that was giving us such a hard time is one of my twins, Emma. She has been a frequent subject here on the blog, from birthday announcements, Photoshop tutorials, product reviews, portrait sessions, and of course stories I was never supposed to share with the public.

Emma has come home from the hospital and is recovering wonderfully and I get to sleep in something that holds my entire body (unlike the cot at the hospital that had a mattress about as thick as a beach towel and left my feet dangling off the end).

Life is good.

Again, thank you.


Happy Birthday America...


And a happy 4th of July to you, hopefully you have fun family activities planned for today.

If those plans include fireworks and you'll be bringing your camera along to shoot them, here are a few tutorials on getting the best possible fireworks images (here, here, and here).

Have fun. Be safe.