Odds and ends, bits and pieces...

1. Today Scot Kelby posted an open letter to the Whitehouse offering to save them $360,000 in exchange for just one household appliance.

Though it was satirical I really, really, really hope they take him up on the offer.

2. If you are not a regular reader of David Ziser's blog you really should be, the information he shares is invaluable and it's visually outstanding too.

3. Carolyn Wright (aka the Photo Attorney) has posted several times this week about photo contests grabbing exclusive image rights from those who enter their contest(s), this would include Oprah Winfrey.

4. If you are a proud owner of a Nikon SB-24 but are frustrated because you can't find online documentation, you'll find it here. I have three of these bad boys and if you want to expand your "bag of light" you can get them on eBay for around $60. Don't be concerned that they are a few generations old (like me) because they are sturdy, reliable work horses.

Shooting at Disney's Animal Kingdom...

Probably one of the most unique shooting opportunities at Disney is on the Kilimanjaro Safaris at Animal Kingdom.

You have the opportunity to see (and photograph) animals most of us only get to see on television.

The best place to sit is in the last seat (so you can turn and shoot as you drive away) and on the left (every time I've taken the ride it seems the vast majority of animals are on the left of the vehicle).

Below are some images my friend Stacey took on a recent trip and was kind enough to share.

(click on an image to view larger and in a new window)


Self assignments at Disney...

After a hiatus of several years my family is finally heading back to Disney this year (the week after Thanksgiving). It already dominates the conversation as we talk about the things we are going to do and laugh about things we've done in the past.

The challenge for photographers is to shoot something different while you are there (because really, what photographer would take a Disney vacation and not bring their camera?).

Last week Scott Kelby wrote about giving yourself a self-assignment at Disney World (I know, I know, I often refer to Scott, but considering his contribution to the world of photography, why wouldn't I?).

Here are some shots of birds that weren't even "part" of Disney, they were simply hanging around outside our room at Saratoga Springs (click on an image to view larger and in a new window):


And these were taken at Animal Kingdom:


More about our upcoming seminar...

I am pleased to announce that Dane Sanders has joined our growing list of sponsors and that one of the seminar attendees will be taking home his new book "Fast Track Photographer".

Just a bit more information about our upcoming photography seminar:

There will be 3 professional photographers (and assistants) teaching for the entire day, Gary Lowell, Mark Hensley, (and of course) myself, while the class size will be limited to 25 so that each student will have plenty of personalized instruction and attention.

During the afternoon each of the shooting stations will be manned by one of the instructors and will also have live models (as apposed to the icky dead ones).

;)

Through the course of the afternoon all students will rotate through each shooting station, getting individualized instruction and experience shooting a model in each of the different lighting scenarios.

We will also be setting up a seminar Flickr page so that folks can share the images they capture at the seminar, as well as sharing the images you will capture when you get back home using your newly learned skills.

One of the side benefits of attending seminars like this is meeting other photographers and the friendships that develop.

There will be more information and a permanent seminar page coming out next week.

Weekly Photo Tips first photography seminar...

We are proud (excited, giddy, nervous) to announce that Weekly Photo Tips will be teaching it's first all day seminar on Sunday May 31st!(in my mind people are now jumping to their feet, clapping, whistling, and hooting their heads off)

;)

The goal of the workshop is two fold, first to give you the knowledge and confidence to control your camera (not it controlling you), to get it off "P" and capture the image you see (not what auto settings of your camera thinks you see), second is to show how to use simple everyday stuff you may already own to aid you in capturing that image, so that you don't have to go out and buy those expensive accessories.

Here are the details (as we have them so far):

Date: May 31st 2009

Location: North Dam Mill - Biddeford Maine

Schedule:

8am – Registration
8:30am – Seminar begins
12:00 – Break for lunch
12:45 – Return from lunch and organize for afternoon shooting
1:00 – Shooting begins @ 3 different workstations / setups
4:00 – Q&A session
5:00 – Seminar ends

Morning Curriculum:

1. Intro
2. How a camera works
3. Equipment – flash, lenses, filters, PC cables, cactus wireless triggers, pocket wizards, snoot, diffuser, grid, other light modifiers, other light modifiers, diffusers, reflectors, light stands, umbrellas, rechargeable batteries.
4. Defining exposure (general explanation)
5. Shutter Speed
6. Aperture
7. ISO
8. Lighting
9. DIY (low cost, no cost) projects & how to use them - Snoots, grids, tricking out your Cactus wireless triggers, building a beauty dish, V-Cards, using rechargeable deer lights, soup container diffuser, building lighting tent, etc.

Break for lunch

Afternoon Shooting (3 stations):

1 – Shooting station with natural (window) light, reflectors, diffusers
1 – Shooting station with two speedlights
1 – Shooting station with halogen work lights

Cost: $175

Each attendee will also get a thumb drive containing all of the information we cover in the seminar (for future reference), photography projects, a list of recomended reading, a bazillion links to photography and DIY sites, and much, much more.

Every attendee will also leave with a gift from one of our sponsors, which currently includes Lumiquest, Kubota Image Tools, PRESSLite, and Power PAX.

The signup page has not yet been completed so if you want to reserve your spot now simply drop us an email and we will save your seat and contact you when the registration form is available.

Studio Strobes vs. Off Camera Flashes...

Yesterday Scott Kelby's post "Studio Strobes vs. Small Off-Camera Flashes" discusses the pros and cons of both these lighting options and is well worth the read.

Personally, I fall on the side of the "off-camera flash" category for a handful of reasons:

1. The cost - lighting can be an expensive proposition and purchasing both studio strobes and off camera flashes (for location shoots) simply doubles that cost.

2. Laziness - I did not want to take the time to master two distinctly different lighting systems and then have to take the time to "think" about which lighting system I was using at the moment and how I needed to set it up. By using one lighting system in all situations it became second nature more quickly, I am thinking about the shot, not the equipment.

3. Power - I don't have to worry about where I am going to get power when I go on location. Often people will say "but you must go through batteries so quickly", not true, rarely do my flashes fire at full power, usually they are at 1/64 or 1/128 power which means they cycle quick and shoot forever.

4. Flexibility - with a single clamp I can put a flash in places you could never get a studio strobe.

5. Safety - Everything is wireless so I have no cables to deal with, and often no light stands either. My flashes are clamped onto doors, bookcases, sitting on table tops, etc.

6. Space - There are shooting scenarios that simply don't have the room to use studio strobes.

7. Portability (this is a big one for me) - my "bag of light" is a Tamrac 614 and is stuffed with everything I need: 2 SB-800's, 3 SB-24's, 5 pocket wizards, diffusers, gels, rechargeable batteries, 1 Quatum Turbo, 1 light meter, 1 rocket air blaster, lens pens, several Lumiquest light modifiers, different size reflectors and diffusers, 3 table top light stands, 2 mini stands, 2 shoot through umbrellas, and a partridge in a pear tree. Try getting that much studio lighting power in such a small space.

Alright move away, I am now stepping off my soap box.

;)

I know that there are many good things about studio strobes (like the amount of light they can throw) and reasons to have them, I'm not saying that off camera flashes is the only way to go, it's just the only way to go for me.

Wahoo!....

Last week (and for the very first time) Weekly Photo Tips went over 1,000 subscribers and I have you to thank.

Ya, I'm talkin' to you.

I had no idea when I started writing this blog back in July of 2007 that it would become what it has.

What started out as a way to share cool things I found on the web with my photography friends has turned into something much bigger.

We get thousands of visitors every month (one third of which come from outside the U.S.), have had the opportunity to play with/review all kinds of cool photography gadgets and doo dads, and have become a trusted source for information.

But the people I have met, the friends I have made because of this blog has been the biggest (and best) unexpected pleasure.

Thank you for making this blog what it is, thank you for spending some of your precious time here with me.

Don't judge a book by it's cover...

How many times has you mother said that to you?

Too often (and too quickly) situations, or worse people, are judged by how they look and if they don't measure up they're summarily dismissed.

I tell my girls (and myself) that it's best to keep our mouths closed and our minds open, to be receptive to all that may be out there.

I think the lesson is this, if we are not open to the possibilities, we are the ones who lose.

Be open to the possibilities today. Let yourself be surprised.

If you are a subscriber and the video does not come through on the feed, stop by the blog and give up 3 minutes and 46 seconds of your day to be surprised and inspired.


Bohemian Secret Lightroom presets...

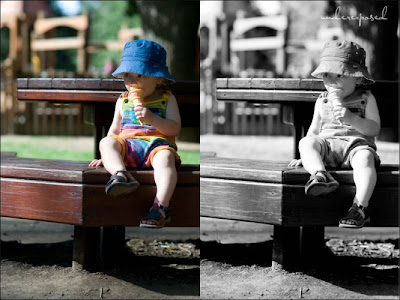
Back in January I reviewed the Photoshop actions "Bohemian Secrets" from Australian photographer Sonia, calling the actions "the best black and white conversions you'll ever see".

Well Sonia has since come out with Bohemian Secrets Lightroom presets and I was not disappointed (you won't be either).

This set has 60 presets that not only include wonderful black and white conversion options, but you also get a great deal of exposure control as well, including tonal control, the ability to adjust over and under exposed images, contrast, tinting, backlighting, vignettes, and more.

No other presets that I have tried give you the depth of control with black and white conversions, this is why the Bohemian Secrets Lightroom presets are only the second set of presets I have installed (and use) on my computer.

Sonia is obviously passionate about her photography and a lover of black and whites, fortunately for us she likes to share as well.

Click on any image to view larger and in a new window.


Review of a new product - Sticky Filters...

Not to be confused with Sticky Fingers (of Rolling Stones fame).

;)

This falls under "build it and they will come".

The problem is getting the correct color temperature when shooting under the varied lighting conditions we find ourselves in (florescent, halogen, etc.), and suffering through getting (and keeping) a light correcting gel on our flash with rubber bands, velcro, gum, and spit.

The solution would be to grab the correct gel, press it against your flash and shoot away.

Heck, even I can do that.

Well, now you can.

Midsouth Photographic Specialties has a very cool new product called Sticky Filters.

Yes filters/gels have been around for some time, but this is a huge leap forward in their evolutionary development.

The genius is the "stickiness" that is applied directly to the gels, similar to that found on a Post-It note.

Peel, stick, done.

Sticky Filters come in two sizes, 2" x 3.25" for speedlights, and a Junior size measuring .5" x 1.5" for point-and-shoot cameras and small pop-up flashes.

They also come in five flavors, .5 Tungsten Bulb, Cool Fluorescent, Warm Fluorescent, Unknown Fluorescent, and Hazy / Open Shade.

When you order you'll get two complete sets of filters, for a total of ten filters (2 of each flavor) and they come with a lifetime trade-in policy, should your gels become "less sticky" over time, simply send them in and for a nominal fee ($10) you will be sent a brand new set of filters.

Can't beat that, not even with a big stick.

This is a very good (and extremely useful) product and if you use gels, if white balance is important to you, then Sticky Filters should be in your bag.

My only hope is that in the future they will come out with more vibrant colors (brilliant red, deep blue, etc.) to use for creating/changing background colors.

Microstock photography part III...

Just in case you missed them, here is Microstock Photography Part I, and Part II, now onto part III.

Here are more microstock resources that will help you learn more about and guide you on the road to generating income with stock photography.

1. Rasmus Rasmussen has put together a 52 page .pdf "Microstock Photographers Guide" that is a must read.

2. Mike over at TheStockBlog.net is shooting stock and is sharing his experiences with us.

3. Nil to Mil is Matt & Sarah Antonino, on their blog they are chronicling (and sharing) their microstock journey from nil to their first microstock million.

4. Microstock Diaries is a blog for people who sell photos online, particularly in the microstock market. One of the things I really like about this blog (and there are many things), is that each month they show you their earnings report, what the sold, how much the made, and from which stock site the sales were generated.

5. Laurent Dambies at the Microstock Experiment is sharing his earning statements as well, along with the rest of his journey through the world of stock photography.

6. Here are three posts (and a video) from Yuri Arcurs, an overview of microstock agencies, what to shoot/what sells, and keywording.

This is a hot and expanding segment in the world of photography, so you can count on there being a part IV.

30 people + 1 flash = great portrait!...

This is going to be short and sweet, as the impact is more visual than written.

Zack Arias (of One Light fame) took a portrait of 30 people in a theater using a single Nikon SB-25 speedlight and a Gary Fong Lightsphere.

The results speak for themselves, see it here.

I have a new man-crush!

;)

"Why are Pro Photographers so expensive?"...

That is the title of an article that is a must read for folks who make a living with their photography, or hope to do so.

Here is the intro:

"In this digital age where everyone has digital cameras, scanners and home "photo printers", when people upload their photos to a local drug store website and pick them up a few hours later, we hear this all the time - How in the world do Professional Photographers charge $55 for an 8x10 when they cost just $1.50 at the drug store?

Here's why.

Simply put, you're not just paying for the actual photograph, you're paying for time and expertise. First, let's look at the actual time involved. If you don't read this entire page, at least read this first part."


To finish reading the article follow this link.

Thanks to Shawn, Pamela & Gavin Richter for putting this together.

Paint Shop Pro X2 Ultimate for over 50% off!...

Best Buy is having a big sale on Paint Shop Pro Photo X2 Ultimate this week (ending Saturday April 18th), you can get it for only $49 (instead of the regular price of $99).

Not only do you get it at a great price, they are also throwing in a 2GB thumb drive.

Follow this link to find a BestBuy near you.

Win yourself a Canon camera!..

I want to close out the week by letting you know that the good folks over at Your Photo Tips are having a contest, the grand prize is a 10 megapixel Canon PowerShot.

Your Photo Tips has always been a part of my blog roll, and here is yet another reason to pay them a visit.

Can't remember the last time I posted on five consecutive days (if ever), hope you found it all worthwhile.

Have a great weekend!

Lighting for newborn session...

I told you yesterday that if you came back today, I would share with you how I lit the session, you will soon see it was barely worth the return trip.

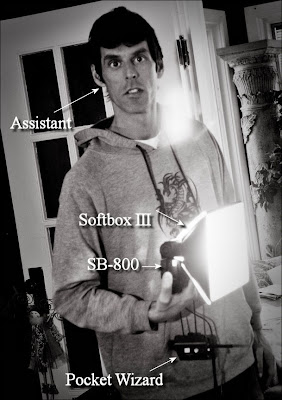
It consisted of just 4 things:

1. A single Nikon SB-800 Speedlight
2. Pocket wizards
3. A Lumiquest Softbox III (A new product I really, really like)
4. An assistant (also known as Steve)

Steve would extend his arm (holding the Lumiquest Softbox III) over my shoulder, as high as he could over the subject(s), so it was simply a matter of saying "A little closer", "more to the right", or "I'm really not comfortable with you pressing against me like that".

;)

Steve is also a photographer and a very good assistant, he sure comes in handy on a shoot that involves 4 or 5 Speedlights, adjusting the stands and/or the power of the strobes.

This is the fist time I have shot with the Lumiquest Softbox III and I have to say it gets two thumbs way up. It's large (8" x 9"), easy to use, it has a double layer of diffusion material in the center to reduce the possibility of hot spots, and it produces a large soft light (it reduces the flash by about 2 stops).

Though it is a good size diffuser, it folds flat so it can be easily taken on your photographic travels.

Dave Hobby over at Strobist did an extensive review on the Softbox III that should further convince you to make the purchase (it retails for $45).

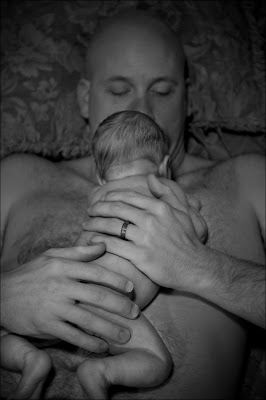
Here is one more image from that newborn session.

Click on image to view larger and in a new window

Newborn portraiture...

Here are some images I shot a few days ago at a newborn session, come back tomorrow and I'll show you what I used for lighting (hint, it was minimal).

Click on any image to view larger and in a new window.


Microstock photography part II...

I recently blogged my first post on (micro)stock photography and you should know that there will be more in the future.

One of the things I really like about microstock is that you practice and improve your craft with an added benefit of the chance of making money in the process.

Many "life coaches" will tell you if there is a place you want to be, find someone who is already there and learn from them.

With that in mind, today I want to feature Nicole Young, another iStock photographer extraordinaire.

Nicole is a photographer living in Monterey Bay, California and recently hit the "Diamond" level on iStock Photo (25,000 images!).

Be sure to check her out on her website, her blog, and on iStock Photo.

But before you do, take a few minutes to watch (and learn from) the video below.

Wireless flash tutorials with Scott Kelby...

Actually it's with Scott Kelby AND Matt Kloskowski as well as guest appearances in all three episodes by Joe McNally.

Over on DtownTV they recently did a 3 part series on wireless flash using the Nikon SB-600, SB-800, and the new SB-900.

In Part one they cover how to set up a flash for wireless operation, tips from Joe, and how to trigger a wireless flash with your camera.

Part two goes over setting up channels on your SB800 and SB900 flashes, Joe’s SB900 tip is on using the flash zoom, and a demo on using flash groups with multiple flashes.

In the final episode (aka part 3) wraps up the series with SB800 and SB900 accessories, Joe’s tip on using IC Filters, and extending your flash use with battery packs.

You can download a very helpful .pdf from Nikon called "Fast Track to Wireless Speedlights".

Modifying your Cactus triggers & receivers...

For those of you who have the Cactus wireless flash triggering system (or know those who do), what are the biggest problems/complaints?

1. Misfires
2. The short (semi) reliable working distance
3. Expensive batteries
4. Short battery life

Well Jeremy Kuster will show you how, with $20 and a little bit of work, you can overcome these problems and more.

In his tutorial Jeremy will add an antenna to the transmitter to increase both firing reliability and shooting distance, add a AA battery pack to the receivers to increase your shooting time and dramatically decrease your battery costs, and finally he walks you through adding lanyard to the receivers for safety and ease of use.

The tutorial is well written and photographically documented, making it easy to understand and follow.

The video below is from Roy Niswanger of Motley Pixel, in part 1 he tests the Cactus system (documenting its short comings) and in videos 2 through 4 he uses Jeremy's tutorial and walks us through modifying his Cactus triggering system and was kind enough to let us watch over his shoulder while he did it.


Photographing the African Children’s Choir...

Last night the African Children’s Choir was performing here in southern Maine and I had the pleasure of photographing them.

Please take the time to read about who the African Children's Choir is, how they got started, and what they are doing to change the lives of these children, and hopefully changing Africa.

Hearing their stories, watching them through dinner, while they rehearsed, and then perform in the show was absolutely magical (I won't share how I got a little choked up 'cause that would make me look like a girly-man).

;)

But for the shooting part, that wasn't so magical. There was a single light tree with just three small spots on it, so shooting (without flash) was a nightmare. A lot of shutter drag and holding my breath hoping to be as still as possible was the order of the night.

Though I did not get as much as I would like, I loved what I got.

There are currently two choirs on tour, Tour 31 and Tour 32, check the dates because this is something you really don't want to miss.

Click on any image to view larger and in a new window.


A review of Topaz Adjust...

I recently played with Topaz Adjust and have discovered a reason to start using Photoshop again.

Topaz Adjust is a Photoshop exposure plug-in that offers a combination of 22 different actions, each one customizable. You can go from gritty to painted with a bunch of stops inbetween.

The interface is clean, intuitive, and has a nice hover help system, simply mouse over any of the buttons and you will get a popup bubble with an informative description of how that button works.

Within the interface you are able to take different "snapshots" of the image you are working on and then apply/customize different actions on each snapshot to determine which one you like best and want to use.

I can ramble on about the things I like about it, but Topaz Adjust is one of those tools that people can use very differently, how I use it may not be how you use it. So check it out, you can view the online manual to learn more about it, and download it for a free 30 day test run. Get the Windows version here, and the MAC version here.

To see it in action you can watch one of the three video tutorials, an overview, general functions, and noise reduction. One of the cool things about these videos is that Topaz Labs allows you to download the original image and "play along".

In closing I simply want to say that this is a plug-in I am very happy to have added to my toolbox and I think you will be too.

Because there are so many variables, I could not show you all the image possibilities, but here are some images I tweaked with Topaz Adjust.

Click on any image to view larger and in a new window.

Firemen in action:


Cowboy up: