Details of the Mike Palmer shoot...
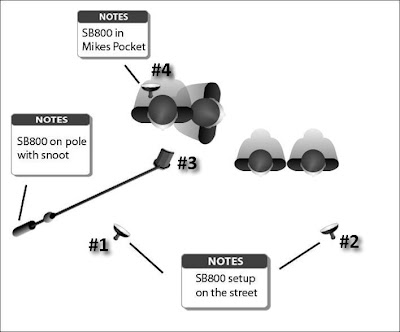
There were 4 flashes used, all set on manual, and all fired by Pocket Wizards.
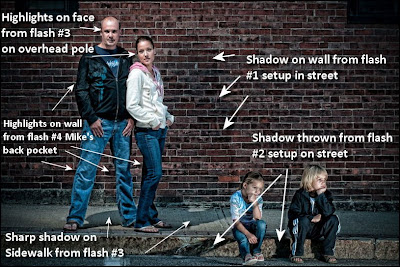
#1 - This flash was setup at (about) the 8 o'clock position, was mounted on the table top stand that came with it so it sat directly on the street about 3-4 feet away, was "bare bulb" and was set at 1/32 power. It was tilted high to provided fill light on Mike & Julia's face. You can see the shadow on the wall behind them that was cast by this flash.
#2 - This flash was at (about) the 4 o'clock position, was hand held at about face level of the children was 2 feet away, was also "bare bulb" and set at 1/32 power. This flash was positioned to provide full head to toe light on the children. You can see their shadow on the curb is sharper than the one on the wall behind their parents because of the closeness of the flash.
#3 - This flash is on a paint pole using a Kacey Pole Adapter (you can get it @ Midwest Photo for $18.99), had a snoot on it (the only flash with a light modifier), set at 1/8 power, and was held about 2 feet overhead and slightly to the front of Mike. I wanted this flash to have an effect of looking like a street light. You can see the sharp shadow on the sidewalk under Mike and Julia that was cast by this light.
#4 - This flash was literally in Mike's back pocket pointing directly back at the wall and was set @ 1/64 power. I wanted this light to throw just a "whisper" of light on the wall that would "rim" Mike and Julia provided separation and depth.
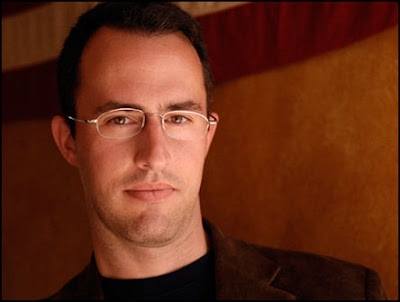
There was no magic formula for the settings, I have been using my flashes in manual since watching the Strobist DVD's last December, after awhile you start getting a "feel" for what the power settings should be. Take a practice shot, then move (or adjust) the flash until you get the lighting effect you are looking for. That's why I have the shot of Mike alone, it was a shot to test the setup.
Regarding the Strobist DVD's, they are also available @ Midwest Photo for $139 and should be considered an educational must.
I marked up the images below to provide visual cues to go with the text above (click on either image to view larger and in a new windows).
All of the images were processed in Lightroom, with the exception of the one below, I used Topaz Adjust to give that gritty "Dave Hill" look.
Lastly, I want say "thanks" to Mike for letting me use his family portraits on the blog,
Photographer Mike Palmer was in town...
While he was here Mike asked if I would do a family portrait for him. I really hate taking pictures for friends, what if they hate it? And to make it worse, a friend who is a photographer, they'll surely find out I really suck!
Mike gave me just two bits of instruction, he wanted the portrait to be done in front of a brick wall, and he wanted it "edgy". I would consider myself a "traditional" kinda photographer, so "edgy" was taking me a bit out of my comfort zone.
So I took him to main street here in Biddeford and shot in front of one of the (many) old factory buildings.
I used 4 Nikon SB800's, two sitting on the street, one held on a boom with a snoot (similar to this) to make it look like they were standing under a streetlight (even though it was broad daylight), and the final flash was in Mike's back pocket pointing towards the brick wall (to give some depth to the image and separation from the wall).
So there was the Palmer family, my lighting setup (two of which were actually in the street), and my two to "VAL's" (voice activated light stands - AKA assistants) on one side of main street and me shooting from the other side, you can just imagine how traffic slowed down to "rubber neck".
It was fun, Mike was very happy with the results (or because he is a good friend he lied to me), and I was happy to have been taken out of my comfort zone to shoot something different.
The shot above was a "practice shot" to check the lighting (my wife thought it looked like and album cover).
Lightroom & Camera RAW updates released...
You can download the Lightroom 2.4 update for Windows here, and the MAC update is here.
The Adobe Camera RAW 5.4 download for Windows is available here, and the MAC can be found here.
Have a great weekend folks!
Weekly Photo Tips Update...
To make the blog a bit more user friendly, and so folks did not have to search through 2 years of blog posts looking for a review, we have listed them all on the menu bar to the right.
As we do (and post) new reviews they will be added to the "Our Product Reviews" menu.
Subscribers will need to actually visit the blog to view the list as the reviews (and other menu options) do not get "pushed" through to subscribers.
Sorry about that, but actually stopping by the blog isn't like getting poked in the eye with a stick, or having to eat a bug.
What format do you shoot?...
Engagement Shoot...
This is Carolyn and Zack, a wonderful couple who are getting married next month.
They wanted their engagement portraits shot at the beach and whenever I shoot there I try to do so during the "golden hour", because the light is phenomenal, eliminating the need to drag supplemental lighting (and other equipment) to the beach.
Which is a good thing, because as much as I like shooting at the beach, I do not like the effect sand has on photography gear (I try to NEVER change lenses at the beach).
I was happy with the images, but more importantly Carolyn and Zack were happy with them.
My only problem was there was obviously a problem with my assistants camera, because there is just no way that I am that gray, or that wide!
;)
From lemons to lemonade...
Here in Maine the last 2 weeks have seen some very wet weather, during one 24 hour period last week we had 4 inches of rain, and in total we've received over 8 inches.
And it's supposed to keep raining for at least 4 more days!
Once I finish this post I'm going to put the finishing touches on the materials list for my ark.
;)
But enough about the weather.
During a lull in the (rain) action I grabbed a new lens I bought a few months back but hadn't used all that much, it's a Nikon 60mm f/2.8G AF-S Micro.
You can get this lens at places like Adorama for just over $500.
I bought it for a few reasons, it's highly rated quality glass, it's fast, and it's a macro lens (what Nikon calls "Micro"). Being a macro lens was a big factor as I did not have a macro in my bag.
So I put it on my camera and headed out I go to grab some shots of water droplets. While I was shooting I was surprised at how quiet it was (important when shooting events like weddings and you don't want to be intrusive), and just how close I could get to my subject, within a few inches.
Now I could bore you with technical blah, blah, blah about this lens, but the most important thing to most photographers is, "what do the images look like?"
The five samples below are straight out of the camera, no filter was on the lens while I shot, no post-processing of any kind was done, the only thing I did to these images was reduce their size for posting.
I am extremely happy with the quality of the images and looking forward to using this lens more in the future.
(click on any image to view larger and in a new window)
I love Fathers Day...
Though it doesn't suck that they got me an iPod Touch this year.
;)
If I had to share just one thing I have learned about being a dad it would be:
"The most important thing a father can do for his children is to love their mother."
Not only does it teach my daughters how to treat other people, it teaches them how a man should treat them.
I hope all you dads out there have a great fathers day.
More on the movie UP...
Okay, all set?
Three weeks ago I posted about the new Pixar movie Up, well yesterday the movie was in the news again and for all the right reasons.
Colby, a terminally ill 10 year old girl really wanted to see the movie but was just too sick to go to the theater, well Pixar got wind of this and showed up the very next day with a DVD of Up for her to watch.
Sadly, Colby died just a few hours after seeing the movie.
I don't share this with you because it's sad, I share it because it's such a pleasure to see a big company like Pixar doing the right thing. You go Pixar!
Too bad it's the exception, I long for the day when it's the norm.
You can read the story here.
Shooting with 2 lights...
I shot with 2 Nikon SB-800's, the primary (light) SB-800 had a snoot on it and was setup at about the 5 o'clock position, the secondary (light) SB-800 was at about 9 o'clock and had a homemade grid on it.
It didn't hurt that the model was the type that you could drop the camera and still get a good shot.
;)
Q & A with Matt Kloskowski...
Here is the beginning of yet another new new feature here on Weekly Photo Tips, more interviews, and I am starting out with Matt Kloskowski.
A. I don't have a real defining moment for when and how. I know I dabbled with photography in high school but the darkroom really made things difficult for me at the time. When digital came out I got back into it and got my first DSLR back 2001.
A. I'll answer the "what" part. The "who" list is really long. The largest influence on me was looking at other people's work. I've read through countless books and magazines and I always pay attention to other's photography and what I like about it. I've always tried to put into words what I like, and then write it down so I can use it in my own photography later. I have pages of notes about ideas and things that I want to shoot so whenever I had a camera in my hand I'd refer back to those notes of things to keep in mind.
A. About 5 years ago, I got a call from the HR person over at the NAPP (National Association of Photoshop Professionals). I had written articles and done some web videos for them in the past and she asked if I was interested in a full time position. Two weeks later, I had a new job and I've loved coming to work every day since then.
A. My Layers book. Its a book that came directly from teaching and hearing what problems people had with Photoshop. I just listened to the folks that I was teaching and wrote the book that covered the questions I got asked the most. Plus, it was a really fun book to write and create projects for.
A couple of questions for you (yes, you!)...
1. "Sunday Sales". The first thing I do on Sunday morning (after making my mega gulp cup of coffee) is to jump online and peruse the sales (Staples, Best Buy, etc.) looking for photography related items. Things like blank media (DVD's and CD's), external hard drives (for image backups), memory cards, and photo paper.
I usually don't post on Sundays and it would not take that much time (or effort) to post any of the goodies I find.
2. "Assignment Shooting". This one would be a bit more fun and involve your participation. Once a month we would have a photo assignment (either a technique, a specific subject, or both) that we all would shoot and post the results to our Flickr group (yet to be created). There would be no winners or losers as this would NOT be a competition, it would be us "shooting together" and learning from each other.
So, those are my two ideas, let me know if either one "moves you" by leaving a comment here, or emailing me directly.
If you have an idea or suggestion other than these two, let me know that too.
I am looking forward to your thoughts and your input.
Lowepro Mini Trekker Photo Backpack...
You can get this Lowepro Mini Trekker from more than half off, it's on sale right now for just $79.99 (regularly $179.99) at Adorama, and the shipping is free too.
Adorama also has memory cards on sale as well, the Kingston Technology 4 GB Compact Flash Memory Card for $34.95 (free shipping) and the Kingston Technology 8 GB Compact Flash Memory Card for $49.95 (free shipping).
Both of these cards have a speed rating 45MB/sec read, 40MB/sec write and come with a lifetime warranty.
But wait, there's more, four more to be exact (and come with free shipping):
SanDisk 4 GB Extreme III Compact Flash Card - Pack of 3 - $44.95 (after $60 Rebate)
SanDisk 8 GB Extreme III Compact Flash Card - Pack of 3 - $84.95 (after $80 Rebate)
SanDisk 4 GB Extreme III Secure Digital Card - Pack of 3 - $39.95 (after $60 Rebate)
SanDisk 4 GB, Extreme III Secure Digital High Capacity (SDHC) - Pack of 3 - $74.95 (after $60 Rebate)
Shooting maternity portraits...
Here are a few maternity portraits I shot this weekend.
I really enjoy photographing pregnant women, it's such a wonderful, happy time in their life and I get to sit in on it.
Just a simple thing like asking them to put their hands on their belly will bring a smile to their face and they truly glow.
Just a few things I like to do for maternity portraits:
Surely mom has been online looking at maternity portraits for months, so the first thing you need to do is ask "what have you seen that you like" and "what would you like to do". Have her email you the links of her favorite shots, not that you will necessarily try to recreate them exactly, but so you have an idea of her likes and help you in planning the direction of the posing.
This is all about mom and trust me, she has a vision set in her mind and it's our job to tune into it.
Whenever possible I try to shoot at the woman's home, you'll be in her environment, she'll be more at ease, more relaxed, and anything she may need is right there.
Another reason to shoot in her home is that because you shoot these portraits so late in the pregnancy the babies room is fully furnished and decorated, so lots of good props and shooting opportunities are available there.
I try to shoot maternity portraits with available/natural light and a good source are those big 'ol sliding glass doors, so be sure to bring a sheer backdrop to throw over them (the image above with her "pointing" her toe was shot just this way).
Be sure to bring a medium sized reflector/diffuser as well, this will help push light into your subject from a near by window, or soften the light if she is sitting right next to it.
Black & White. I think maternity portraits are more elegant, more timeless, and simply becomes a better image as a black & white.
Lastly, I am often asked "I've never shot maternity portraits, how do I get my first job?".
Easy, give it away.
Find a family member, a friend (or a friend of a friend of a friend) and offer to do a session for free. You get the experience, youll have a start to your maternity portfolio, and they will be thrilled to have the images. And even if it goes really well the first time, you may want to give away at least two sessions (and maybe three) because everything that you'll need to know/experience will not come from just one session.
It's important to be up front and honest (it protects you and controls their expectations), explain to them you have never shot maternity portraits before, that you're trying to get the experience, and DON'T make any promises. This way if things don't turn out so well they will not be surprised or (as) disappointed, but if you do get some good images not only will they be happy, they will be showing (and emailing) your images to everyone they know while singing your praises.
The best advertising (and most referrals) come from happy customers.
If you are interested in shooting maternity portraits the Digital Photography School has three articles that will give you some really good information and ideas:
5 Keys to Taking Beautiful Maternity Portraits
Tummy Time - 7 Tips for Taking Great Maternity Shots
How to Shoot an Indoor Maternity Session
(click on any of the images to view larger & in a new window)
A post I may regret...
The one thing I did know, was sure of, was this blog was going to stay positive, "do no harm", then as we started receiving products to review that thought process led directly to our "review policy".
I have received products for review that I did not work for me, I have been to seminars that I did not like, but kept it to myself. Perhaps the seminar instructor was having an off day, maybe I was not using the product correctly or it would fill a need, it just wasn't a need I had.
So my trepidation (a word I have never used in conversation before) comes from the inside.
The route of my unhappiness (more like my whining) comes from my Pocket Wizards. (whew... there I said it). Not the Wizards themselves, but from their customer service.
At the end of December I bought 5 Pocket Wizards and along with accessories, re-chargeable batteries, whizbangs, hoohas, and flarsnooples (I have read way too much Dr. Seuss in my life) the total investment was over $800. Not sure about you, but for me, that kind of money is a BIG investment.
And I love my Pockets Wizards, I use them often and they are an important tool in my photography, the problem started when just a few weeks after my purchase the Pocket Wizard folks announced their new line that now allow you TTL and manual control.
I called them, explained my recent purchase and asked if they were going to offer an upgrade (it is not uncommon for software and hardware vendors to offer an upgrade to recent purchasers for no charge, or a nominal fee). I was told there were "no plans at this time, but call back after the release". When I called after the release I was asked for my phone number and was told to expect a call back. The call never came.
As the reviews piled up extolling the features of the latest model it was starting to irritate me (kinda like sand in your bathing suit) that no one ever called me, so in March I sent an email explaining my situation (in a calm and polite manner no "do you know who I am?" or "I hate you"). At the very least I expected a polite form rejection email in return. Nope, got nothin' back.
So after another month of "nothing" I printed out the email and snail mailed it (now you're thinking "not only is he a whiner, he's a freaking stalker too!"), only because from time to time the "ball gets dropped" and I thought this may have been one of those times.
My snail mail got the same attention and response as my phone call and email... nada, nothing, zilch.
As outstanding as my Pocket Wizards are, as happy as I am with them, I could not be more disappointed with their lack of customer service.
Please understand my unhappiness is not because I could not upgrade my Wizards, it's because I was not important enough for them to even respond to, they blew me off on three separate occasions.
I once had a customer who was not very happy with her portrait images, I returned her money, re-shot the session, and gave her a print for free.
Long after people forget what you did for them, they will remember how you made them feel.
Every ad I see for Pocket Wizards in a photography magazine or website reminds me I don't feel very good about the Pocket Wizard folks.
Variations on a Two-Light Theme, Pt. 3...
The final post in the series "Variations on a Two-Light Theme" has been posted.
This series is really well done (as usual) and in line with the theme of "keeping the light simple".
So head on over to Strobist and check it out.
Just in case you missed them, you can find Part 1 here and Part 2 here.
I know I gush about David hobby/Strobist but in my humble opinion he has done more to educate photographers than any other source out there and I share some of his postings here because I found out that many of my readers are not regular followers/readers of Strobist (shame on you!).
And now for something completely different...
This was not the post originally planned for today, there has been an issue bugging me since January (photographically speaking) but in keeping with my policy to keep things positive on the blog I bit my tongue thinking "this too shall pass".
Well, it hasn't and maybe by tomorrow I'll have found the testicular fortitude to post about it.
;)
Keeping the light simple...
How cool is that shot, it's a gull wing Mercedes 300SL shot by Ken Brown (my new man crush).
;)
This is Ken's third appearance on Weekly Photo Tips, the first was in a review of "Trade Secret Cards" (quite by accident, the card I showed was a shot of a car setup/shot by Ken), the second post was more intentional, it was a video of Ken shooting a car with a single Nikon SB-24 speedlight.
When you look at his images you can't help but think, "holy cow, look at how beautifuly that's lit, I wonder how he did it?". Then when you see the setup, the simplicity of the lighting makes the end result even more impressive.
In the above image ken used just two SB-24's attached to "eBay triggers" (aka Cactus triggers) placed on the seats, and that's it. So his lighting setup cost about $200, which is well within the reach of most photographers.
If you want to learn more about Ken and see his incredible body of work you can visit his website, his blog, or his Flickr page.
Shoot your Nikon or Canon wirelessly...
Pete Tsai has put together an ingenious device for under $50 ($49 to be exact) that allows him to shoot his Nikon wirelessly!
Now keep in mind that this is not the easiest of projects, it does take some time, some effort, and a bit of technical savvy to put this wireless tether together, but Pete lays out step by step instructions (with a bunch of pictures) that even an idiot (like me) can follow successfuly.
Pete has written that followers of his blog who shoot Canon and Sony have followed his design and the wireless tether works for their cameras as well.
You can get the plans here at Pete's blog.
Flare photography with Kristin Zecchinelli...
Last year, during Scott Kelby's world wide photo walk I had the pleasure of meeting Kristin Zecchinelli (aka "Maine Momma").
Kristin ended up as the winning photographer of the walk, not only was her winning shot great, she had a great collection of images from that day and you can view some of those images here.
Though I enjoy looking at her images, it was when I started following her blog that it became obvious that she truly loves photography and is a genuinely good and caring person, which kept me coming back for more.
One of the things Kristin does well (and loves doing) is flare photography, so much so that she now has a "Flare Fridays" Flickr group (with over 600 members and almost 3,000 images).
You can also see Kristin's personal Flickr pool of flare images here.
If you are interested in trying some flare photography she put together an easy to follow tutorial.
So, I wanted to share some of her images and her blog with you because she is a photographer worth following.
Enjoy.