Bill & Ed's excellent interviews...


One of my favorite online resources is StudioLighting.net, if you are a photographer this is a "must" visit website.

You'll find lighting setups, studio lighting tutorials, DIY Projects, and video tutorials.

My favorite resource is their podcast "LightSource" with Bill Crawford and Ed Hidden.

Each podcast is about an hour long, starts out with a few minutes of news and happenings from the world of photography followed by a lengthy, in-depth, and extremely interesting interview of working photographers.

You'll find interviews with photographers like Chase Jarvis, David Tejada, Mark Robert Halper, Dave Hill, Zack Arias, and David Hobby (is it me or are there a lot of "Dave's" on that list?).

Their podcasts also include in-depth discussions on shooting RAW, using Gels & Filters, and the ins & outs of light meters.

Because these are audio podcasts they are extremely portable, I find myself loading them onto my iPod or burning them to CD so I can listen to them in the car and take them with me wherever I go.

My only complaint (and it's a selfish one) is they don't do nearly enough (they produce a new show about once a month), if I open iTunes and there is nothing new downloaded from LightSource I get all pouty and whiney for an hour or two.

;)

But seriously, take Bill and Ed for a test run and you will be hooked too.

You can find a complete list of all their podcasts here, enjoy.

Lightroom workflow with Matt Kloskowski...

This 6 part Lightroom workflow video was put together by Matt for Scott Kelby's World Wide Photo Walk.

Though it's just an overview, it's over 30 minutes long, very informative and shows why I am (and you should be) a big fan of Matt and the good folks over at the National Association of Photoshop Professionals.

You can get more of Matt (and a lot more education) at Lightroom Killer Tips, DTown TV, Kelby Training, and Photoshop Killer Tips.


Another featured photographer...

Well, it's Monday and we have another photographer to feature.

Her name is Ghene Snowdon, and she's from London.

Often when I'm checking my stats I'll follow the subscriber information to learn about the folks who visit Weekly Photo Tips, I get to "meet" new friends and look at there work.

I am always amazed at just how many outstanding photographers there are out there (and also wonder why they come to my blog). It is not uncommon that I start following their websites as I love looking at their new work.

Ghene is another photographer who does beautiful work (and who's website I am stalking).

When I first saw these images I was blown away with the quality of the lighting and I really wanted to share them with my readers.

Ghene was kind enough to let me share them with you and she took the time to answer a few questions.

Here they are:

If you could select one area of photography to focus on, what would it be?

"That would be weddings I absolutely love the fuss, the details and the ending :-)"

Why do you shoot Olympus?

"I tested several cameras and thought the Olympus E-500 felt very good and I already liked Olympus from my old point & shoot days. I still use my E-500 for interior shots- the images are warm and they are very different from those I take with the E-3.

Professionally or when I am sure the weather will not be forgiving, I use my E-3 and my E-500 tags along. On walks, I bring the E-420 (smallest DSLR) and now, I have the E-P1 which fits perfectly in my handbag (with two lenses and a couple of extra batteries). It may seem silly of me to choose Olympus when I specialize on natural light, but the results are worth it."


What is your favorite lens (and why)?

"I love the Zuiko Digital 14-54mm f2.8-3.5 Mk1. It is a very sharp lens, takes close-up photography and it is weatherproof. I also like Sigma 30mm f1.4"

If I looked in your camera bag what would I find?

"You will find the: E-3, E-500, and E-420, ZD14-54mm lens, Sigma 30mm1f.4, FL50 flashgun, wireless triggers, business cards, extra batteries, memory cards (2x 8Gig and 4x 4Gig), Olympus E-P1, Olympus 17mm pancake lens, Olympus 14-42mm lens, small circular reflector, lens pen, glass cleaning liquid and cloth"

How do you market your business?

"Internet. 85% of my business comes from the internet, 10% referrals and recommendations and the other 5% from local paper."

Is there one thing you do that really “pays off” when it comes to marketing?

"Do a good job, talk and blog. If a client is satisfied, they will talk too."

RAW or JPG (and why)?

"Mainly RAW because I have more control on the development after the session. For parties, RAW + JPG because there are times when I need to project a favorite image or to print it right there on site."

Lightroom or Photoshop (or neither)?

"I mainly use Lightroom, I made presets so my workflow is relatively fast but even with that I still need a week to finish a normal session. I am an absolute beginner in Photoshop. I have Photoshop CS4 but I only use it to fix eyes, patch unwanted stuff and touchup skin. I thought of learning more but never have the time."

Be sure to visit Ghenes blog and her website to learn more about her and see more of her wonderful images.

Click on any of these images to view in a new (and larger) window.


Lighting: These images were taken with available light from the large bay window and a silver Lastolite triflector.

Equipment: Olympus E-3, 14-54mm 1:2.8-3.5 Mk1 lens, exposed for 1/125 at f3.4 at ISO 200.

Images from yesterdays wedding...

We shot a wedding yesterday for Carolyn and Zack at Point Lookout in Northport Maine, a great couple, a beautiful setting, and with some real crazy weather (more of that later this week).

The bride was extremely elegant and here are a few shots that kinda demonstrate that.


Kubota hits it out of the park... Again!

A little over a year ago I told you about an innovative Lightroom workflow tool call RPG keys.

RPG Keys is an external keyboard that works specifically with Lightroom allowing you to review, organize, edit, and apply presets to your photos.

Well, fast forward a year and the RPG keys have taken a huge evolutionary step forward, not least in the list of new and improved features is the fact that they have partnered up with Kevin Kubota and this handy little workflow tool is now called the "Kubota RPG Speedkeys".

The new keyboard is about the size of a handheld calculator, is wireless, and also includes v3 of the Kubota Presets standard.

One thing has not changed, this is a serious tool for photographers who prefer spending more time taking pictures than editing them. I mean really, do you want to spend longer editing a wedding than it took you to shoot it?

There is a (small) learning curve because you need to train your fingers, but like anything else (or any other keyboard), the more you use it the better (and faster) you'll become.

I know some of you will follow the links in this post and be a little hesitant when you see the price of $349, don't be. Why do you buy a $2,000 lens, spend $700 for Photoshop, or $150 for faster memory card? Because it improves your practice, it provides a better product for your clients, and it gives us a better workflow.

Kubota RPG Speedkeys will take it one step further, it does all those things AND it will give you back the thing most important to all of us, your time.

If you have to spend less time editing your images you will have more of it to do the things most important to you (like playing Barbie Uno with your daughters, or throwing a stick to that dog who never seems to tire out).

You have two choices for the SpeedKeys (other than PC or MAC), you can order just the Kubota RPG Speedkeys or you can order the Kubota RPG Speedkeys and Kubota RAW Workflow for Lightroom 2 combo pack (you can read the Workflow for Lightroom DVD here).

The reason I am a Disney fanatic is that you get a great product while treated like the most important customer they have, Kubota is Disney World for photographers, great products with even better service.

I could ramble on about the keyboard and why I like it, or you can watch this 5 minute video from Kevin that will give you a great overview of what the Kubota RPG Speedkeys are all about.


Photographing boats in Maine...

I was shooting a wedding with Stacey Kane this past Saturday in Boothbay Harbor (Maine) and the reception was on the water.

Literally.

The reception was on a pier and as the sun was going down I grabbed a couple shots of these boats as they floated close to each other on their slips.

(clicking on either image will open them larger in a new window)


The camera settings were the same for both images.

Camera: Nikon D300
Lens: 28-70mm F/2.8D
Focal Length: 70mm
Aperture: F/3.5
Shutter Speed: 1/100
ISO Sensitivity: ISO 250

When photography goes to the dogs...

Recently I stopped by a really nice locally owned dog store, as my three miniature schnauzers would have no less and it's their world, I simply get to live in it.

I favor locally owned businesses vs. "big box" stores for a bunch of reasons, not the least of which is that I actually receive service and I'm supporting my neighbors... okay, this is me stepping off my soapbox now.

The owners of Sooper Dogs had put aside a small area where other businesses could leave fliers and business cards and I was immediately drawn to a brochure left by a photographer who specializes in dogs.

I picked up the brochure and was immediately way impressed with how wonderful the dog portraiture was, so when I went home and checked out the blog and website and learned that the person behind the camera matched the quality of the images.

So I contacted the photographer and asked if I could show her work to you good people, so ladies and gentlemen, here is Meredith Perdue.

When did you get into photography?

"After my grandmother gave me my first Minolta at age 10".

What do you shoot with?

"I upgraded to a Canon SLR when I joined the high school yearbook staff. Since then, it has been all Canon for me and I've always been extremely happy with their products and services. I began shooting with a 5D last summer and upgraded to a 5D MK II earlier this year - I love them both! After looking at the photos I've submitted, you might think I only have (or use) one lens- my 24-70mm f/2.8L. While I have several other great Canon lenses, the 24-70 is one of my favorites, and most useful, for dog photography. Dogs can be quick subjects and some are always on the move. With the 24-70 I can go from a fairly wide shot to a tight shot in no time. I love my 50mm f/1.4 and use that at each session too. I pull out my 70-200mm f/2.8 if the dog is a little camera shy and likes their space. Using a fisheye lens with dogs is always fun for me - I love the distortion on a dog!"

How did you get started with dogs?

"I began photographing my own dog, Orvis, which came quite naturally to me, as he & photography are two of my life's loves! I started a daily photo blog for Orvis, Life: Lab Style and began posting a photo of Orvis each day of the week. I then moved on to photographing friends' dogs and quickly found my passion. I've discovered that I am at my happiest rolling around on the ground with a dog, camera in hand. Dogs have nothing to hide when they're in front of the camera- which makes them my ideal subject!"

What is your favorite accessory?

"I just started using a Shootsac for my lenses during shoots. I love having everything I need at my fingertips, without having to wear my bulky camera bag on my back The stylish cover is an added bonus! You'll also find some photographer staples like a water bottle, CF cards, flash, business cards in it. No shoot is complete without some delicious dog treats! I always have a few kinds of all-natural, grain-free treats in my bag, for dogs who might be on a special diets."

How do you market yourself?

"I'm a big believer in word of mouth marketing. Taking care of my clients is at the core of this belief for me. When clients are happy, they talk! I also use social media sites like Facebook and Twitter to promote any news or discounts, along with my monthly e-mail newsletter. I'm extremely fortunate to have a studio storefront with giant windows where I can display my work or promote any sort of special I might be having. My studio is located in a family friendly beach neighborhood, across the street from the town's favorite bakery and right next to a new (and delicious!) ice cream shop. I'm lucky to be located in such an awesome space with a great amount of foot traffic!"

Take a minute to visit Meredith website and blog, her images will bring a smile to your face.

Here are a few more of her images, click on any of them to view in a new (and larger) window.

"I consider this picture to be one of the first times I fell in love with photographing dogs. I was attending a photography workshop on Cape Cod and my assignment was to document one of the YMCA camps there. I chose to cover the camp from the angle of Gracie, the "camp dog." I had a blast following Gracie around for two days and seeing what life as a camp dog was like. Needless to say, she lives a great life!"

Equipment: Canon 5D, 24-70mm lens, exposed for 1/800 at f3.2 at ISO 400.

"I took this of my own lab, Orvis, on a trip to the Pemaquid Lighthouse. I have it printed on a 20 x 30 canvas behind my desk at my studio. The image is very "Maine" to me, I include it in a lot of my marketing materials, as many of my New England clients can appreciate the notion of dogs & lighthouses. It's also reminiscent for me, on a personal level, of a wonderful, lazy Sunday afternoon spent with my family."

Equipment: Canon 5D, 24-70mm lens, exposed for 1/2000 at f2.8 at ISO 200.

"I snapped this photograph of my mother's golden retriever, Mason, as he was rolling around on a soccer field in North Carolina. When I look at this photo I'm reminded that it is the little things in life that make us the happiest. Mason looks completely content with the world and could roll around all afternoon with this tennis ball in his mouth."

Equipment: Canon 5D, 24-70mm lens, exposed for 1/3200 at f2.8 at ISO 400.

"I took this photograph of my dog, Orvis, one afternoon as he was looking out the window. Orvis is an extremely tall lab and we're always commenting on his long, skinny legs, this is a personal favorite!"

Equipment: Canon 5D, 24-70mm lens, exposed for 1/40 at f2.8.

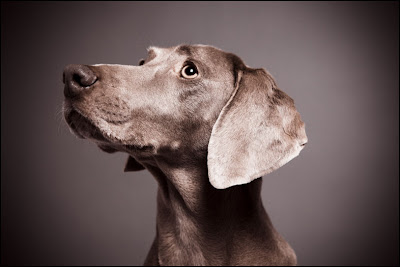
Here are the details for the image at the beginning of this post:

"Conjure, a Weimaraner, came to the studio for her session a few months ago. I caught this majestic-like moment as she looked up at
her owner, Jill."


Equipment: Canon 5D MK II, 24-70mm lens, exposed for 1/160 at f5.0 at ISO 200.
Lighting: One Alien Bees flash unit with a large softbox.

Setup details for Bob's portrait shoot...

Here are the lighting details from yesterdays post of the portrait session with my friend Bob.

I used 5 flashes, 3 Nikon SB-800's, and 2 SB-24's, all manually set (we don't need no stinkin' TTL), and all fired with Pocket Wizards.

#1. This flash was setup at the 5 o'clock position, about six feet off the ground and with a snoot. This was used for highlighting the stone birdbath that was next to the gate (and Bob).

#2. This flash was at the 2 o'clock position and was about 3 feet off the ground. It had a Gary Fong Lightsphere on it, the top was removed, and the open end (top) was pointed at the foliage. I had the Lightsphere on without the tops because I wanted to throw strong light over the center (and top) of the patch of plants, with more defuse light as it moved towards the outside edges.

#3. This flash was sitting on the ground about 12 feet behind the gate and pointing straight up to light up the trunks of three trees that were grouped closely together.

#4. This flash was 1 foot behind the gate, also pointing straight up, this was to highlight leaves that were several feet over Bobs head.

Because I only have five wizards (ya, I know - "ooooh, poor Scott") and needed six for this shoot I used a "Y" cable with an extension cord to link flashes #3 and #4 together, allowing them to be triggered with a single Pocket Wizard.

#5. This flash is on a paint pole using a Kacey Pole Adapter and had on a 2' x 2' soft box, it was held a couple feet above and to the front of Bob.

I shot the portrait as it was getting (quite) dark as I thought this kind of lighting would make the garden more dramatic, and I wanted to challenge myself as well.

If I had it to do over there are a few things I would do differently:

I would put LED lights on the stone birdbath, it may have provided a more interesting image.

Put a green gel over flash #2 may have given the plants depth and a more "vibrant" look.

Flash #5 should have been brought more to the front of Bob (closer to the camera) as it would have done a better job lighting his eyes.

Below is a diagram of the lighting setup, a photograph from the shoot showing some of the flashes, and an image of the gate taken while we were setting up.

(clicking on any of the images will have them open larger and in a new window)


My 5 light portrait of Bob...

The seed for this portrait was placed a few months back, someone said to my wife "you must have a lot of nice photographs of the kids" to which she replied "nope, I'm the cobblers wife" (referring to the story of the cobbler so busy making shoes for his customers, he had no time to make shoes for his own children).

Her response wasn't meant to be a "dig", not at all, it simply was the truth.

The sad truth.

Many photographers are too busy "paying the rent" to capture the people and things closest to them, and I realized that I really needed (and wanted) to break that cycle and take more images of the people close to me.

For them and for me.

Bob was next in line for several reasons, his birthday is just days away and gifts that are made for you are way better than those that are bought for you. Yes, even that afghan your grandmother made with colors that are illegal to put together. Think about it, every inch of that yarn slipped between her fingers, there is love in that afghan (and hopefully a hint of her perfume too). That's waaaay better than a blanket from Wal-Mart.

Bobs gardens, a labor of love for him, are in their summer splendor as well so the timing was right for two reasons.

And you may not realize it, but you already know him (a little), you have heard me talk about "my friend Bob" before.

If I had to describe him to a stranger it would be simple, "Bob's a good man".

I was happy with the results, as what I had envisioned came to fruition in the camera (which is not always the case).

Five lights might seem a bit daunting, but it's not, as you work through how you want a shot to look it's pretty simple. "I want this lit, I want the light to fall across these plants from right to left, and this should be lit using a grid..."

See if you can deconstruct how these images were lit and if you come back tomorrow I will explain (with pretty diagrams and lots of arrows) how it was setup. See ya then.

More on yesterdays Pocket Wizard post...

Yesterday we talked about using in inexpensive "Y" cable from Radio Shack that would allow you to fire two flashes with one Pocket Wizard.

Well last night I had a shoot that required 6 pocket wizards (I have 5) and was going to be the first real world test for my inexpensive "Y" cable system.

The problem was that the flashes that would be closest to each other would be about 10 feet apart, too far for just the "Y" cable, so I stopped by Radio Shack on the way to the shoot to grab an extension cable.

As luck would have it this week Radio Shack has the 20 foot cable on sale for $4.50.

If you are so inclined you too can have the "Y" cable and the 20 foot extension for $11.

Come back tomorrow and you'll see the results of last nights shoot.

Two Pocket Wizards for the price of one...

I have been looking for a splitter that would allow me to fire two flashes from a single Pocket Wizard, but they have proven hard to find and those I have been able to track down (at camera stores and online) were pretty darn expensive, anywhere from $30 - $80!

As luck would have it I was stopping by Radio Shack for a completely unrelated reason and BOOM - there in front of me was a wall of cables and amongst those cables was a dual headphone splitter that looked like it would fit the bill.

So I bought it, went directly home, did not pass GO, did not collect $200, and immediately took out my Pocket Wizards and flashes for a test.

It worked perfectly, both flashes fired from a single Pocket Wizard every time!

The best part was that the splitter cost me $6 (okay, maybe it wasn't really the best part, but it made me pretty darn happy).

Combining the splitter and the sync cables provides about 20 inches of separation between the two flashes, but Radio Shack also has extension cables (in lengths of 3,6, and 12 feet) to will give you greater separation and will cost you under $10.

When a man has a cold...

I am going to assume that my recent cold and someone sending me the video below has no connection what so ever.

Nope, nothing implied, just a happy coincidence.

;)

Sorry subscribers but videos don't come through the feed so you'll need to stop by the blog to see the video.

Gimping right along...

Here are three video tutorials that will give you a "hands on" look at the GIMP interface and some of the (basic) features.

The more I learn about GIMP the more impressed I am, this is one powerful program.

Have a great weekend!


More about GIMP (a Photoshop alternative)...

Back in May I wrote about some free Photoshop alternatives, today I want to give you more information about the most popular of those, GIMP.

I have never used GIMP, but many of you who have took the time to email me to tell me just how powerful it is and how much you love it.

So here are two reviews done by those in the know, they are in depth and will certainly help you in your decision making process.

Here is what KillerSites.com had to say:

"GIMP is incredibly customizable... In fact, this is where it may actually surpass Photoshop... Definitely try GIMP if you’re looking for something new (or something free) to edit your photos. The functionality and customization options are great for a free program although the multiple-window interface could take some getting used to."

You can read the full KillerSites.com review here.

And this is from the review done by the tech site Ars Technica:

"It's clear that GIMP has a long, solid future ahead of it, and is already really impressive. If you don't have the budget for Photoshop and don't want to settle for a dumbed-down app, then bring out GIMP. It won't let you down."

The full (and extensive) review done by Ars Technica can be found here.

If you are familiar with the Photoshop interface, you can make GIMP emulate the look of Photoshop with GIMPshop.

And just a couple more resources to throw at you before calling it a day, you can find GIMP documentation here, and tutorials here, here, and here.

Here are a few screen shots, click on any to view larger and in a new window.


Jo Alldredge Photography...

I want to start year three of this blog by immediately attacking the "to do" list from our birthday posting, this is number three from the list "feature the work of fellow photographers".

This other photographer is Jo Alldredge.

Jo is one of the many people I have had the pleasure of meeting while writing Weekly Photo Tips, and while I was perusing her website recently I came across these images and was blown away with how good they are.

I really like everything about them - the setup, the lighting, the processing - everything.

When I asked Jo about the lighting she said "I don't use a light meter, I use the guess and then check method. I had my husband turning the power up and down and moving the soft box depending on where Cindy was standing and how I wanted the lighting".

Guess and then check is my favorite technique as well.

She did use an Alien B800, an Alien Bee Foldable Large Octabox (47"), and a Vagabond II Portable Power System.

Jo did these images for musician Cindy Standage (you can see more of Jo's work throughout Cindy's website).

Jo processed these images in Lightroom.

Be sure to check out Jo's blog and her website.

(click on any image to view larger in a new window)

Camera: Canon 30d
Focal length: 50mm
ISO: 250
Exposure: 1/250 sec at f/2.8


Camera: Canon 30d
Focal length: 18mm ISO: 320
Exposure: 1/60 sec at f/5.6
(There was only one star in the sky. I cloned in a couple more.)

And the settings for the image at the beginning of the post are:

Camera: Canon 30d
Focal length: 50mm
ISO: 100
Exposure: 1/250 sec at f/2.8

How to photograph fireworks...

Funny, but the older I get the more importance this holiday takes on.

Here's 6 minute (in depth) video showing how to setup your camera to capture the best possible images of a fireworks display.

Have a safe and happy 4th.

It's Weekly Photo Tips second birthday!...

"Happy birthday Weekly Photo Tips... happy birthday to you"

When I wrote the first entry two 2 years ago today I had no idea where it would lead and in my wildest dreams I never thought it would be this much fun... I have you good people to thank. So, thank You, seriously.

The comments you leave and the emails you send are the best part, so please, keep 'em coming.

Here are some of the numbers from our second year:

The past 12 months have seen 61,107 visitors with 81,921 Page Views.

1,203 people have subscribed to Weekly Photo Tips.

Our very first month we had 117 visitors (and I thought that was amazing!), this past month we had 6,992.

You've come from 137 different countries.

The top 5 Countries are:

1. United States
2. Canada
3. United Kingdom
4. Australia
5. Netherlands

And the bottom 5:

133. Niger
134. Swaziland
135. Uganda
136. Iraq
137. Ethiopia

How cool is it that people from Ethiopia and Swaziland have stopped by!

These are the 5 most viewed posts from the past year:

1. Review of Kevin Kubota's Lightroom 2 Training DVD
2. The Gritty Dave Hill Look
3. Get Your Free Lightroom Presets Here
4. A Bazillion Free Photoshop Actions
5. The Best Black & White Conversions You'll See

A few of the stats surprised me, like only 30% of the folks coming to the blog use Internet Explorer (thought IE dominated the browser world, but I thought wrong), and 2% of you actually get here via a dialup connection (I'll keep the images as small as possible!).

While year one averaged 2.6 posts per week, this year has seen an average of 4 posts weekly. I did not realize I had written (or bored you) quite so much.

Looking forward, these are the top 5 things I hope to accomplish in the upcoming year:

1. Redesign the blog for a more "professional" look (including a logo)
2. Establish a Weekly Photo Tips Flickr group and begin our photography assignments
3. Each month feature the work of fellow photographers (come back Monday for the first installment)
4. Begin a "Guest Blogger" segment
5. Publish more interviews from "prominent" photographers

If there are any whiz bang html/web type folks who would like to help tackle #1 please email me.I can promise you this, as much fun as this has been so far, the best is still out there waiting for us to catch up to it!

Here is the (simple) setup for the birthday cake, a Litepanels Micro on one side of the cake (more on the Litepanels Micro next week) and a home made white paper "kicker" on the other (printer paper taped to a cardboard foot), my camera was set on shutter priority @ 1/125th.

A great resource for photographers, Rangefinder...


One of my favorite photography magazines is Rangefinder.

When it arrives in the mail it never leaves my hand, I pull it from the mailbox and immediately head off to find a nice quiet spot and start reading.

If you don't subscribe (and you should) you can still take advantage of their wealth of information by visiting their website, it has many of the magazine articles available plus videos and podcasts.

If you are looking for marketing tips, then you need to check out their regular feature "Marketingmojo".

Rangefinder has been kind enough to make these short (2-3 page) informative marketing gems available online as pdf's for all to view (print out, refer to, and make notes on).

Here are four "Marketingmojo's" to get you started:

Pro Bono Work: Just Do It!

5 Ways to Build & Maintain Client Ties

Targeted, One-on-One Marketing: Smart Strategies for Tough Times

Faces, Spaces, Links, Tweets & Dots: How Social Networking Sites Help Promote Your Studio

So there's your primer, when you finish these be sure to head on over to Rangefinder and get on your Marketing Mojo.